All procedures are performed for cosmetic reasons unless contraindicated.
- vascular plexus on the legs
- Why do spider veins appear?
- parts of the foot
- Lateral longitudinal arch:
- Medial longitudinal arch:
- Drawing the foot
- photo of the foot
- Further information
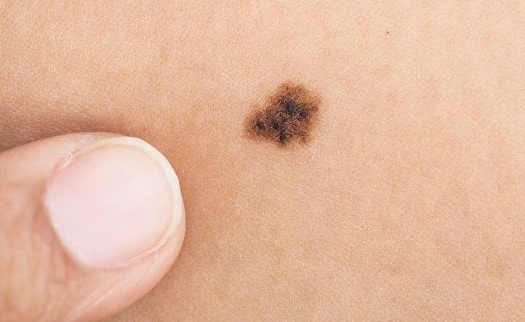
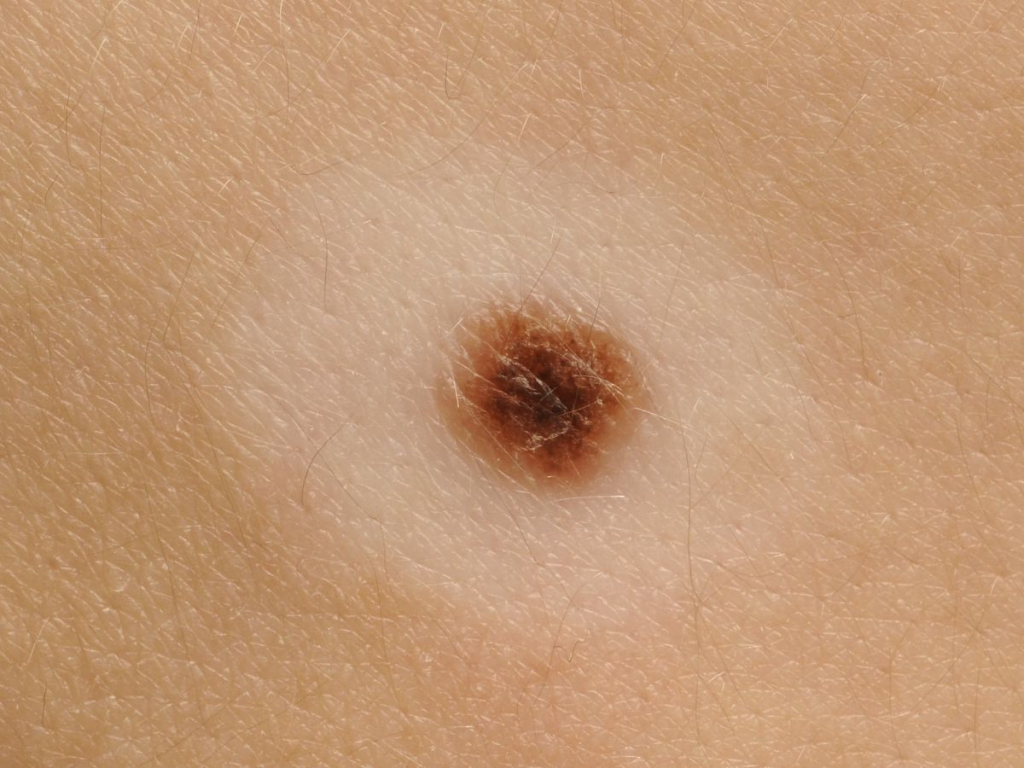
- Sign 3 is 'the appearance of an asymmetry or irregularity of the nevus'.
- Feature 4: 'Irregular discoloration of the nevus (birthmark), with patches of so-called associated depigmentation.
- outstretched fingers
- Transition from foot to toe
- terry nails
- Beau Reil Lines (Beau Reil Lines.
- muscles of the foot
- blood vessels
- shutter speed and exposure time
- Aperture and aperture value
- Is scabies transmitted from person to person and how?
- Symptoms of scabies on hands and feet (first signs)
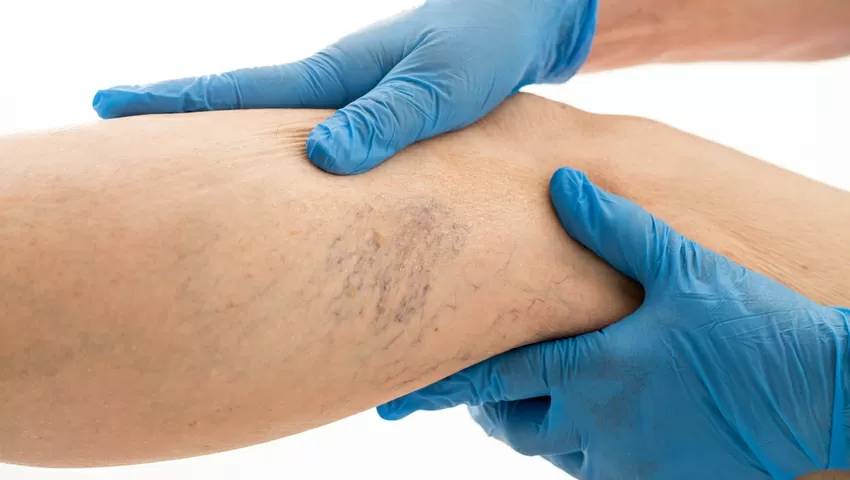
vascular plexus on the legs
One of the most common reasons for visiting a phlebologist is the development of a vascular network on the skin of the lower limbs. This can appear in the form of a chain or interconnected spider veins. In most cases, this pathology is not accompanied by physical discomfort and is not a sign of the development of a serious circulatory disorder, although it can be one of the symptoms of chronic venous disease (CVD).
Patients with spider veins on their legs mainly complain that they do not look aesthetically pleasing.
A venous network (spider veins) is a cosmetic defect resulting from the appearance of abnormally dilated, small-caliber veins. Due to the changes that have occurred, the vein wall has almost lost its ability to expand and contract adaptively.
A vascular network on the legs is not a precursor to varicose veins. According to the current CEAP classification from 2004, these diseases belong to different classes of chronic venous diseases. And they cannot merge into one another, but can be combined. Telangiectasias and reticular varices belong to CEAP class C1, while subcutaneous varices belong to class C2. So it is incorrect to say that varicose veins and spider veins are related.
Why do spider veins appear?
The enlargement of the superficial veins of small diameter is favored by:
- Hormonal imbalances. Varicose veins result from pregnancy, taking oral contraceptives, estrogen replacement therapy or treatment, pronounced disorders of the hypothalamic-pituitary-ovarian system. Hormonal imbalances can be caused by endocrine gland adenomas and systemic glucocorticosteroid therapy.
- Inherited predisposition. Genetic changes in the basic structural proteins of the connective tissue or anatomical features of the vein walls.
- Factors leading to increased peripheral venous pressure in the lower limbs. These include heavy physical exertion, obesity, work that requires prolonged vertical loading. Chronic liver disease leading to portal hypertension.
- Bad habits. Alcohol abuse, eating large amounts of fast food, salty or fried foods.
- Age. The older the patient, the greater the likelihood of venous reticulation due to the age-related decrease in the elasticity of all tissues.
parts of the foot
Let's take a quick look at the structure of the foot: the tarsal or ankle bones in blue, the metatarsal bones or instep bone in lilac, and the phalanges or toes in pink.
The mobility of the foot is limited, as the simplified illustration on the right shows:

Although the first toe joint on the foot marks the 'actual base', the body covers the foot up to the line of the 'apparent base', which is why the toes appear so short (and that they are always curved, as we shall see).
The bones of the foot are arranged to form three arches that support our body. The first two arches form the bottom of the foot and the third arch forms the top of the foot. Squeeze the sides of the foot and notice how stiff they are: The lower part of the foot is not soft and does not deform under pressure.. This means that the arches of the feet hold the position of the adult foot in every position.
Lateral longitudinal arch:
It's barely noticeable. It appears as a small indentation from the heel, both under and outside the foot.

This vault means that. the outer contour is not flat (except for flat feet), as well as the line from the heel to the sole of the foot is not a smooth arcbut forms an arc.

Medial longitudinal arch:
This is a very noticeable indentation on the inside of the foot. The part of the sole that is behind the arch (below the red curve in the drawing) disappears in shadow when the foot is on the ground, but since we usually view feet from above and not from the ground, the arch is clearly visible:
Drawing the foot
An easy way to draw feet is to start with the sole of the foot. No toes, no arch, just the basic shape. This is shaped like a long egg that is flattened on one side (below left).
This flat shape is easy enough to draw in perspective and from different angles. Since this part of the foot is not curved, its flat shape saves complexity. Anatomical precision is not required here, we are just creating a basis for drawing.

If you have trouble with perspective, draw the basic figure on a piece of paper and place that paper at the right angle. It is helpful to observe the shape change from different angles.
In the next step, make a slight correction to the shape by cutting off a corner to get closer to the natural shape of the foot. If it's comfortable, you can start with this step:

Now add volume. As you can see, it is a flattened, curved pyramid, with the tip shifted towards the heel: the circle is the area where the foot converges, forming the ankle. The dashed lines indicate the volume. Only a black outline is required for outlining.

Finally add the toes. You can draw them in individually, regardless of the basic shape, which, as I said, is almost impossible to bend. If necessary, draw a guide to define the general shape of the toes (see lines below) before drawing them individually. They are pressed against each other so that they overlap at almost all corners. Notice the position of the little toe: its base is between 1/4 and 1/3 of the total length of the foot (here the lines divide the foot by 4, so it's 1/4).
photo of the foot
Limb salvage
with high-tech methods
- Vascular and cardiac diseases
- Dry gangrene
- critical ischemia
- Diabetic foot
- Atherosclerosis and its treatment
- Obliterating arteritis
- Arterial thrombosis and embolism
- Popliteal artery aneurysm
- Removal and dissolution of thrombi
- Carotid Artery Surgery
- Aorto-femoral bypass surgery
- Carotid artery stenting
- Microsurgical shunts on the lower leg and foot
- angioplasty and stenting
- amputations due to gangrene
- High risk surgery
- Treatment of ulcers and decubitus ulcers
- Clinical examination
- ultrasound examination
- Computed Tomography
- Subtractive angiography
Further information
In most cases of gangrene, assisted walking can be maintained. Although the dead tissue must of course be removed, a good blood supply allows reconstructive surgery to be performed and allows the patient to move without a prosthesis.
After the dead toe is removed, the wounds usually heal within 3 to 4 weeks without the need for further surgery. After a foot resection, walking is possible again about a month after the dead tissue has been removed. In diabetic infected gangrene, healing is 2-3 times slower.

The same patient 3 weeks after vascular stem flap transplantation. The wound defect is closed. The foot is preserved.
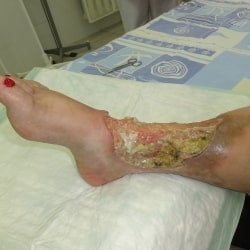
A 55-year-old man with diabetes mellitus, popliteal artery thrombosis, and extensive necrotizing circular tibial ulceration. Endovascular treatment was performed – Rotarex thrombectomy, balloon angioplasty and popliteal artery stenting. Blood flow has been fully restored. Reconstructive surgery was then performed with an islet muscle graft to close the exposed bone and a split skin flap was transplanted.
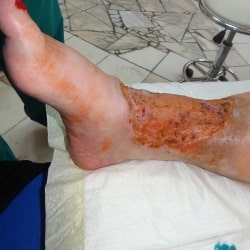
One month after the vascular and reconstructive plastic surgery, the wound was completely healed and the blood flow in the leg was balanced.
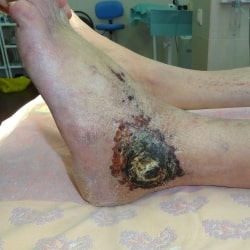
The patient presented with critical ischemia on a background of iliac artery thrombosis. A thigh amputation was proposed at another hospital. The patient was admitted with severe left leg pain that could only be relieved with epidural analgesia.
Sign 3 is 'the appearance of an asymmetry or irregularity of the nevus'.
When the nevus has become asymmetrical in two axes, its entire edge has changed arched or has started one coastline. When the nevus disappears from the map, it's time to see an oncologist.
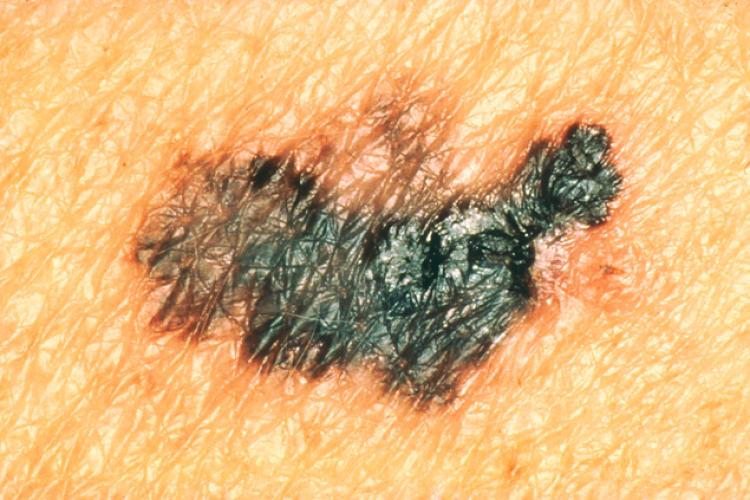
However, if you look closely at a mole on the body with a magnifying glass, you won't find perfect circles or straight lines, even at low magnification. No mole has 100 % even pigment distribution.
You can read more about nevi with irregular borders here
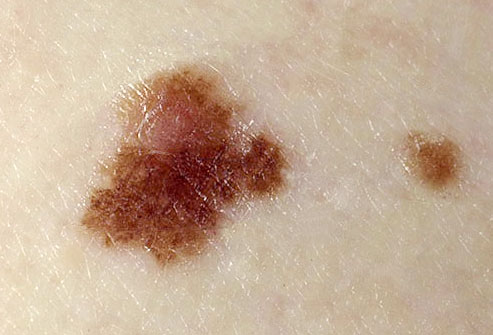
Feature 4: 'Irregular discoloration of the nevus (birthmark), with patches of so-called associated depigmentation.
Melanoma is characterized by an uneven distribution of pigment. If it's a melanoma, the depigmentation (lighter area) will be as irregular as the birthmark itself:

A benign nevus (mole) can usually also have an irregular distribution of pigment, but it is not as pronounced:
Depigmentation may surround the nevus. This is most common with halo nevi:
I will go into more detail about nevi with irregular pigmentation in a separate article.
outstretched fingers
The fingers can be drawn 'clenched' or spread. The first variant is drawn as described above, taking into account the need to 'hide' the lower phalanx.
If the fingers are drawn in the form of an open fan, additional elements should be worked out:
- The space between the fingers. Each finger should contain a small indentation created when the skin tightens and the joints spread. Try spreading your toes and you'll notice this feature.
- instep tendons. Anatomically, our feet used to serve as a grasping organ. What we have left from that time are the tendons that connect the toes and ankle. It is the strained tendons that best reflect the condition of the splayed toes.
We should also remember that when we splay our toes, the little toe always goes down, dragging the other three toes (except for the thumb) behind it. The foot must be drawn with these subtleties in mind.
Transition from foot to toe
When drawing the transition from foot to toe, it is important to express the sophistication of the ankle while emphasizing the correct anatomical shape. To achieve this, a few simple rules must be observed:
- The foot has a vertical hock.
- The heel protrudes in almost all foot positions.
- The inside of the foot is more vertical while the outside curves towards the ankle (bone).
- The ankle also protrudes on the inside but is less pronounced and slightly higher.
- When drawing the back of the leg, it's important to trace the Achilles tendon, which runs up from the heel and is teardrop-shaped. When it rises, it is 'detached' from the ground, so to speak, and does not cover its edges. It is not visible from the front in the drawing.
The foot should not be drawn with a few straight lines. Its structure is more complex and has several curves. Try to take your time with each turn.
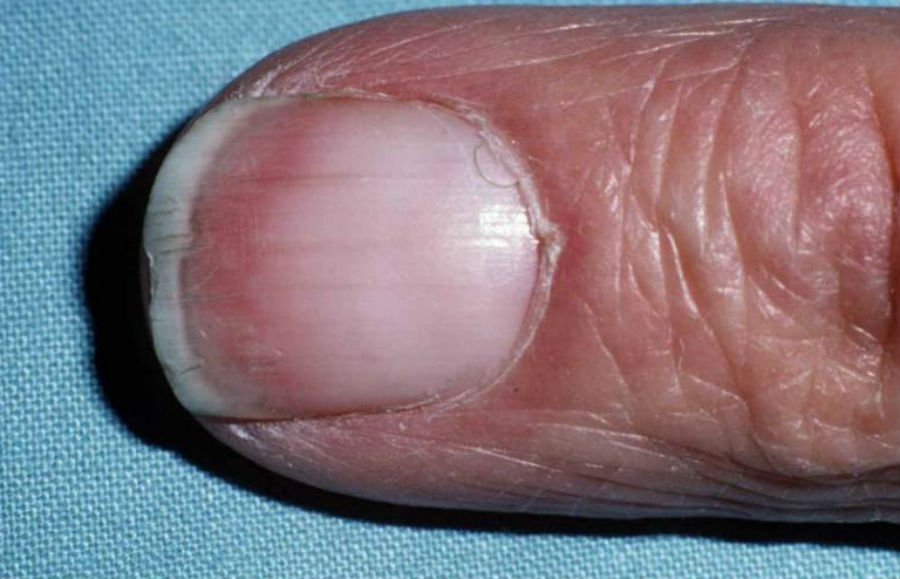
terry nails
This is a condition where the nails look like white frosted glass with a dark streak at the top where the plate separates from the skin. Sometimes this pattern occurs in older people and is not a sign of illness. However, we must not forget that terry nails can also be a sign of one of several serious diseases.
- heart failure;
- liver disease (including cirrhosis);
- Diabetes;
- severe eating disorders with severe small bowel disease and some psychiatric eating disorders.
Such changes have been observed in hemodialysis patients and in kidney transplant recipients.
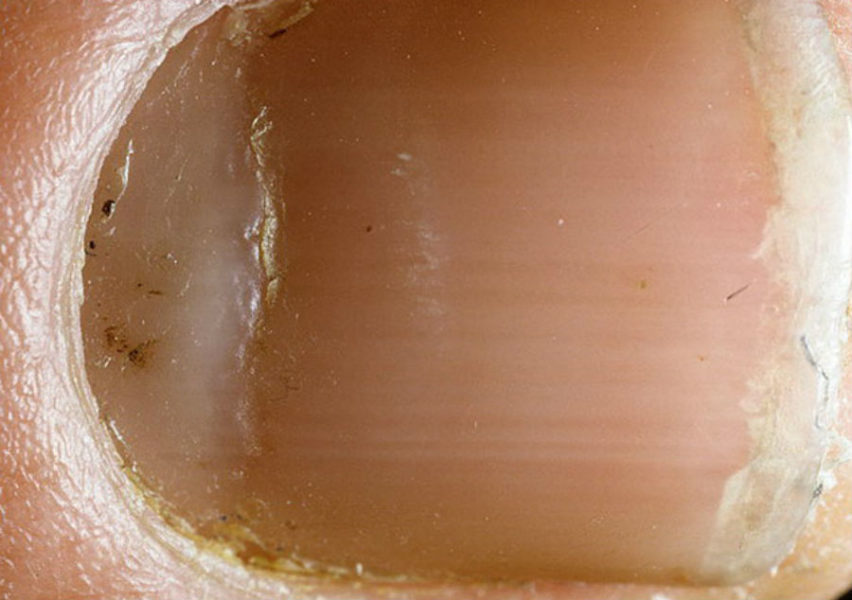
Beau Reil Lines (Beau Reil Lines.
Lines, named after the doctor who first diagnosed them, are deep transverse ridges that run through the entire nail. Such lesions occur when the growth of the nail plate is stopped due to mechanical trauma or serious illness.
The most common diseases that lead to the appearance of Bo-Ray lines are:
Bo-Ray lines usually appear 2-3 weeks after an illness. They indicate that the body has mustered all of its strength to fight the disease and has shut down systems not needed for life support.
muscles of the foot
The movement of the foot is ensured by 19 muscles in the lower leg. There are 3 muscle groups on the sole of the foot. One group is responsible for the mobility of the big toe, the second group for the mobility of the little toe, and the third group for the movement of all toes. The fibers of these muscles are directly involved in supporting the arch of the foot and also have a cushioning function.
There are 2 muscles on the back of the foot that are also involved in the movement of the toes.
All of the other muscles that attach to the bones of the foot but start at the shinbone belong to the shinbone muscles, although they are involved in the movement of the foot.
When muscles are overly tight or overly relaxed, the position of the bones and joints in the foot can change. This can lead to various pathological conditions.
blood vessels
The foot is supplied by 2 main arteries: the posterior tibial artery and the dorsal artery of the foot. These divide into smaller arteries and supply the tissues of the foot with oxygen. The veins return the blood to the heart. They are connected to the arteries by small capillaries. A distinction is made between superficial and deep veins. The longest vein in the body originates at the big toe and is called the great saphenous vein of the foot.
Because the blood vessels of the foot are the furthest apart, blood circulation in this vein is most often compromised. This can lead to atherosclerosis, hardening of the arteries, varicose veins, leg swelling, etc.
shutter speed and exposure time
Camera shutter speed – The length of time the camera shutter remains open when taking a picture. The longer the shutter is open, the more light hits the sensitive part of the camera and the greater the overall exposure. Doubling or halving the shutter speed increases or decreases the exposure by 1 stop.

If you increase the shutter speed from 1/200 second to 1/100 second, twice as much light gets to the photocell, that is, the exposure of the photo changes by 1 stop, the photo becomes brighter. Similarly, if you go from 1/60th to 1/30th, twice as much light reaches the photocell, which is equivalent to a 1 stop change in exposure.
With most cameras, the shutter speed can be adjusted in 1/3 steps, so 3 shutter speeds would correspond to an exposure compensation of 1 stop.For example, if you set the shutter speed between 1/60 and 1/125, you can find 1/80 and 1/100 seconds. This improves the accuracy of the exposure, but you have to be aware that between 1/60 and 1/80 it's a click, but 1/3 of a stop.
Aperture and aperture value
Aperture is measured by the 'f-number', sometimes referred to as 'f-stop', which is the size of the aperture diameter. A smaller f-number corresponds to a larger opening, allowing more light to reach the photosensitive element, while a larger f-number means a narrower opening (less light).

cover (aka relative aperture) is more complicated to calculate, with the degree representing a 1 degree increase in aperture opening when the aperture is increased by 1.4.
The base aperture is 1 (although there aren't many lenses in the world that can open up to 1, but there are some, and there are even some that have an aperture less than 1). Multiplying by 1.4 gives the standard aperture range: 1; 1.4; 2; 2.8; 4 etc. Each consecutive number means that the amount of light passing through the lens has increased or decreased by half. So 2.8 at 1/60 second is the same exposure as 4 at 1/30. The higher the f-number, the narrower the aperture closes and the less light gets into the picture.
Most modern cameras allow you to set the aperture in 1/3 stops.
ISOor photosensitivity, is responsible for the overall exposure of the light source. The lower the ISO sensitivity, the wider the aperture should be open and the slower the shutter speed.

Doubling the ISO sensitivity means that the exposure time has to be reduced by 1 stop. With old cameras this meant the photographer put higher sensitivity film in the camera, while with modern cameras we have increased the sensor's sensitivity to light.
If you e.g. For example, going from ISO 100 to ISO 200 doubles the sensitivity of the sensor, so you need to slow down the shutter speed or adjust the aperture by one stop to get the same shooting conditions. If you switch from ISO 800 to ISO 400, the sensitivity decreases by one notch. Most modern cameras allow you to change ISO sensitivity in 1-stop increments.Is scabies transmitted from person to person and how?
How is scabies transmitted from person to person?
- Through direct contact. In this case, contagion occurs through close contact with an infected person. The parasite is passed from one person to another through shaking hands, hugging, kissing, and sexual contact.
- non-contact. The scabies mite gets on the skin of an uninfected person through sharing household items, belongings, shoes, shared bedding, and other items. They can also be found on objects in public places, such as doorknobs, handrails, etc.
It is believed that the scabies mite is transmitted from animals to humans, but this is not true. Scabies is only transmitted from person to person. If a family member or person in the household is infected, everyone who comes into contact with it must be treated.
All items must be disinfected so that the treatment is not in vain.
Symptoms of scabies on hands and feet (first signs)
The most favorable places where scabies mites multiply on the human body are the hands, wrists, inside of the elbows, soles of the feet and tendons. This is explained by the fact that there is practically no hair there, and the sweat glands are plentiful, which creates favorable conditions for the reproduction of the parasites. It is known that mites die in a dehydrated environment.

Their life products remain in the rodent tubules, which under these conditions quickly decompose, poisoning the skin and provoking allergic reactions and inflammation. The first signs of scabies on hands and feet are exactly the same as the first symptoms above: severe itching in the evening and at night and a rash on the skin.
Remember that hands, feet and arms sweat profusely, and mites actively multiply on them.
What you can do to avoid contracting scabies:
- First and foremost, you need to take care of your skin. Examine your skin regularly At the first sign of scabies, you should consult your doctor and not self-medicate. Better safe than sorry.
- Pay attention to personal hygiene. Try not to use items that do not belong to you. While clean skin is no guarantee that you won't contract scabies mites, if you do get the larvae, chances are they'll be washed off when you wash your hands or bathe.
- Make sure you Wash your underwear and bedding regularly washed in hot water and ironed with a hot iron. House dust mites die at temperatures above 60 degrees.
- If you have carpets and rugs in your home. If you're washing carpets and rugs, take them out in the cold and leave them there for at least an hour. The mites also die off in cold temperatures.
- What are photos in photography.
- X-ray of Charcot's foot.
- Walking in medium heels.
- Anatomy of the foot x-ray.
- foot pattern.
- Anatomy of the heel bone x-ray.
- Walking school with prosthesis.
- Which ligaments strengthen the transverse arch of the foot?.