The nerve endings in the feet allow muscles to send signals to different parts of the brain. Pain impulses are also transmitted via the nerves, which causes us to feel pain in our feet.
- Why you should learn to knit socks with crochet hooks
- Tools and materials for knitting
- Almond cloves
- Square toe
- How do you adjust your cleats correctly?
- Why are there ugly wrinkles in my shoes?
- What happens now?
- Hidden powers
- The toes of the foot are the location
- Another point to pay attention to is fullness.
- Why is it important to choose the right fit?
- More facts about ligaments and tendons
- The Celtic foot – a mixture of different cultures.
- The principle of hospital stockings
- Surgical stockings versus varicose vein stockings – what’s the difference?
- About the choice of stocking: compression classes
- How do you know the right size of surgical compression stockings?
- Other ways to secure the toe of a stocking by knitting
- Snail
- The procedure
- propeller
- Procedure for producing the work
- General instructions
- How to make it easier for yourself
- Cushioning and shock absorption
- How often do you change your child's shoes?
Why you should learn to knit socks with crochet hooks
Perhaps you are asked to learn to knit socks with your fingers for rather trivial reasons.
The main motivation for learning this uncomplicated way of knitting is the fear that there will not be enough yarn for a second sock and you will have to start all over again.
Knitting two socks at the same time using a magic loop and circular knitting needles on a long fishing line can greatly simplify the task. Experienced knitters have calculated that knitting 2 socks together speeds up the work significantly, which is why this method is preferred by many experienced knitters.
If you don't know the Magic Loop method yet, I recommend reading the detailed article on our website '1000 Knitting Ideas': The Magic Loop method is the easiest and fastest method for knitting in the round.
In addition, the socks can be knitted from the toe as soon as the last meter of yarn is finished. Knitting from the tip solves another important problem that affects almost all knitters. From now on you will never have to worry about cleaning up leftovers again.
Socks knitted from the toe are the most comfortable to wear because they are perfect for high hems and problem feet.
If I've convinced you that it's worth learning to knit socks with lace, then read on. If you still have concerns, it means you are not ready to learn this simple method.
For anyone who still has doubts, I promise it is not difficult at all, just follow this guide. You can find out how to knit the classic 5-corner sock in our article about socks with a reinforced heel.
Tools and materials for knitting
To knit toe socks we need:
- Any sock yarn. I used Adelia's Jake yarn. The yarn specification: 400m/100g. Composition: 75% wool, 25% nylon. For the heel, toe and elastic, you can use any contrasting yarn with similar properties.
- Circular knitting needles No. 3, strung with 80 cm fishing line.
- Stocking knitting needles No. 3 for knitting the heel cap.
- Safety pins.
- Gypsy needle.
Almond cloves
These are elongated and tapered round socks in the shape of an almond (hence the name). They tend to look more stylish and elegant than other rounded toe options, but due to their narrower width, they won't fit all men (more on width below).
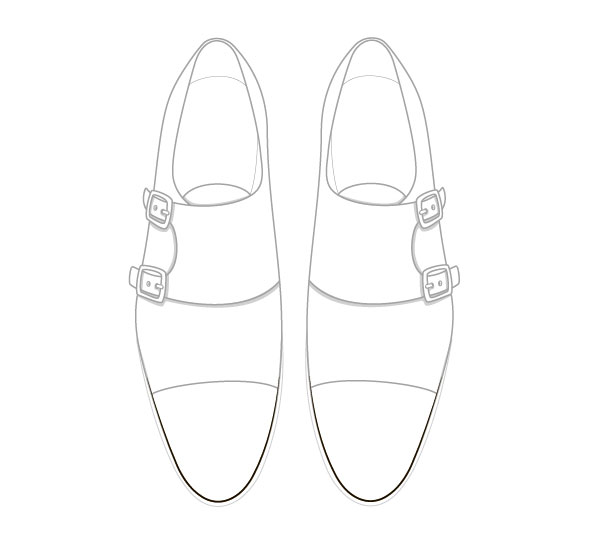
Almond clove
Square toe
This option can be recommended for people with long feet, since, according to Michael Anton, square toes visually reduce the size of the foot. However, he also says that they look a bit cheeky, but in reality, square toes can look very elegant. Avoid these extreme variations that are sometimes found on cheap shoes and boots, which are characterized by straight or almost straight angles and often a massive silhouette. A completely different matter is slightly pointed square toes with a very slight curve and smooth contours. They are sometimes referred to as soft toes. Pointed square toes with an 'aggressive' silhouette can also look good, even if they don't appeal to everyone.
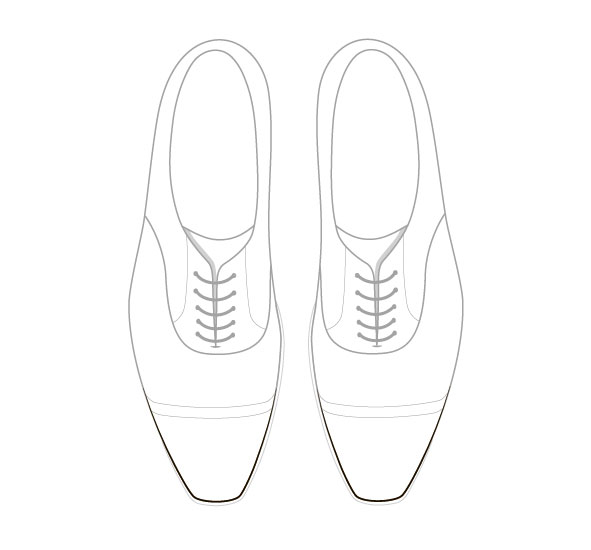
Square toes
How do you adjust your cleats correctly?
If you have just purchased a new pair of shoes, we recommend that you 'fix' them yourself to keep them looking their best. This trick can be especially useful if you've found that the shoes don't fit well in terms of fullness and/or fit, but you don't want to return them.
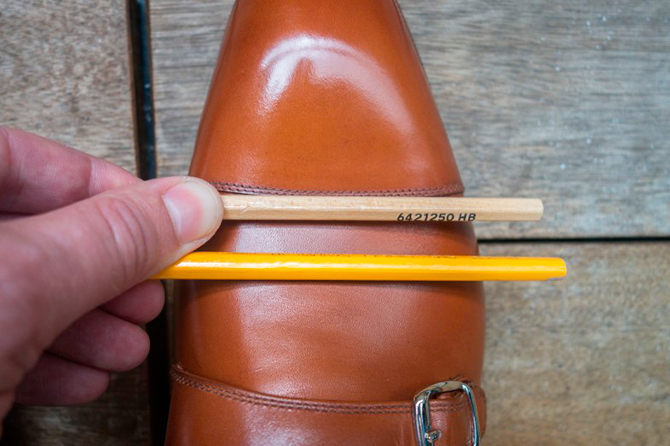
Create folds with pencils
For this procedure, grab two pencils or pens with a smooth, pencil-like surface. Put on your shoes, tie the laces and take these pens (or sticks) in your hand, gripping them with your fingers parallel to each other. Then use these pins to press the part of the forefoot (joint) where you want to see a crease/break. Then move your foot and flex it slightly. If necessary, slightly change the position of the sticks, press them back onto the sole and flex the foot again. When the position of the chopsticks is optimal, bend the foot a few more times. Then do the same process with the other shoe.
Why are there ugly wrinkles in my shoes?
Unfortunately, from time to time you see shoes with very strange looking wrinkles. You probably have a pair like this in your closet. Here is a list of reasons why creases on shoes can become ugly:
- An ill-fitting pair (wrong size, fullness, fit, model).
- Poor leather quality (possibly too soft or too stiff).
- Improper care (drying too quickly, using the wrong cosmetics, wearing the same pair too often).
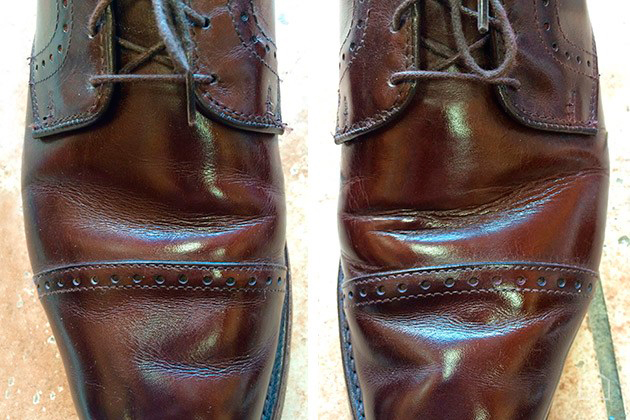
Example of ugly creases on shoes
A crease in the forefoot is one of the most common signs that a shoe doesn't fit well, is made of poor leather, or is poorly made. A crease on the toe (as opposed to a crease on the unisex) can hardly be called aesthetically pleasing.
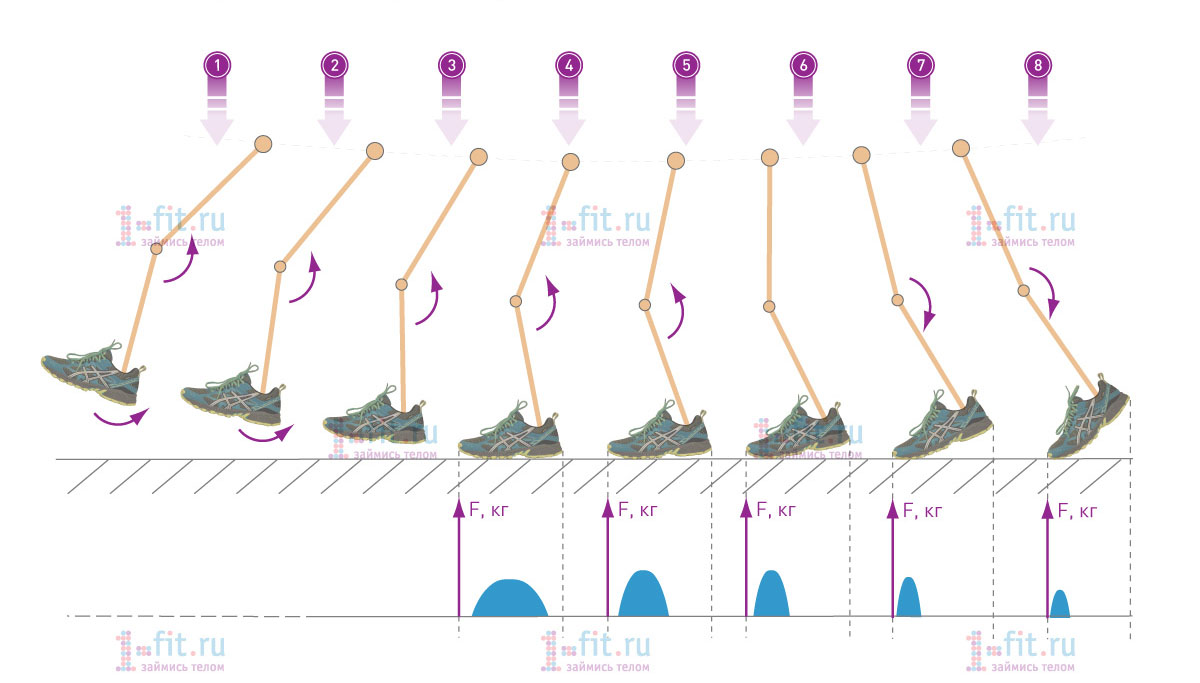
What happens now?
Variant 'A' of the original: the same 'poking' of the heel with every step, which should be avoided.
Variant 'B' is an attempt to simply 'load' the foot. The landing point is moved forward, the ligaments are put under greater strain (especially the Achilles tendon and the tendon ends of the lower calf muscle), the ability to push off from behind almost disappears... Does that sound nonsensical? However, if we take a closer look at amateur runners, we will find a whole series of examples of exactly this interpretation of 'toe running'.
Option 'B' - Someone suggested (or perhaps advised themselves) that you should put your foot under your foot. However, since the foot is on the tip of the toe, this requires a fairly strong forward lean. With such kinematics, the muscles of the posterior surface of the thigh and pelvis almost no longer participate in the pushing force. What remains is a pushing upwards 'as if on springs' thanks to the (apologies to the traumatologists) 'elastic properties of the muscles and tendons' (just to quote the apologists).
With the modernization of the technology described, the beginner runner is initially limited by the calf muscles, but the Achilles tendon soon becomes the limiting factor for the increasing strain. So has something gone wrong again?
Hidden powers
If you only look at the runner's lower body, there are at least four (!) components for the thrust.

Strength side #1: The strength of footwork (which results primarily from rotation of the ankle). This power is typically not visible in photos and videos when analyzing a runner's running technique, but it plays a large role and is extremely different between weak and strong runners. For strong runners, it can drastically change the focus of footwork without being noticeable to the casual observer.
Strength page #2: The work of the knee flexors and extensors in the different phases of running (movement of the shin in relation to the hip). This is something we can only partially see from the outside. We can clearly see how the leg works to straighten (lengthen) the knee in the final phase of the stroke, but few notice how it works to 'scratch' in the initial phase.
Strength Side #3: The hip movement is the most noticeable part of the movement. But here too, something is not taken into account by laypeople. For fast runners, the hips are extended quite high (seemingly excessively high) and then brought back to plant the foot. This 'extra' back and forth movement (not only with the hip, but also with the shin) is often overlooked by those who only analyze the moment of foot landing on the support.
Strength side #4: Hip work (alternating pelvic rotation). Experienced trainers always point out that the ability to 'rake' depends, among other things, on the work of the pelvis. Not to mention that it affects the kinematics of the compensatory movements of the shoulders and/or arms.
The toes of the foot are the location
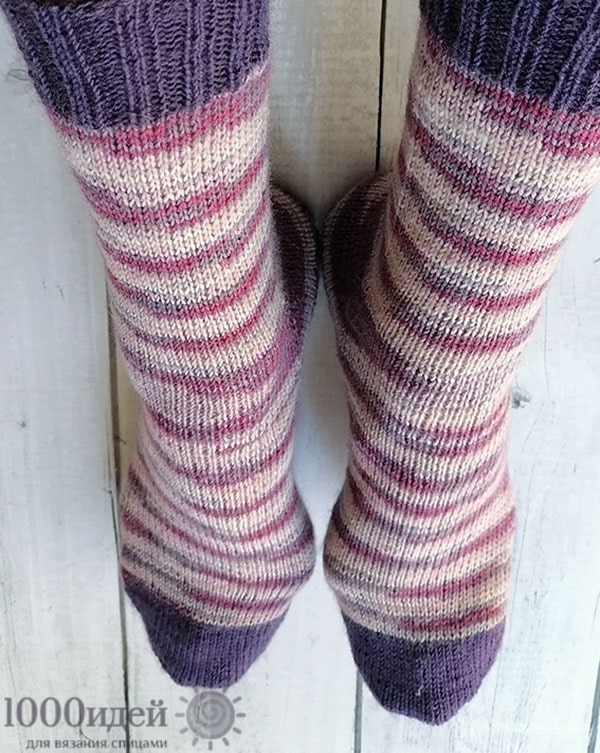
And here are these socks with a round toe and a round heel, knitted from the toe.
These socks are knitted with a gusset on the instep, which looks interesting and fits well on the foot. Since the socks are knitted from the toe, at the point where the gusset begins to rise, you need to calculate beforehand, oh how I don't give these knitting density calculations, and calculate the number of rows…. How to live: I love knitting but I can't count? So I have to knit the same thing several times. I knitted these special socks three times. Those who are better at estimating stitch density can certainly make it quicker, but even with tying three times I still like the socks and it was definitely worth it.
The special thing about these socks is the round toe and the round heel. Winter is here, and in winter everything becomes better. Even socks, as experience shows. Heehee.
Should I tell you how I knitted these socks?
For socks in size 38 you need:
* 400m/100g yarn. – Total 100g
* a set of stocking needles and a set of knitting needles on fishing line.
* Three marks, one to mark the beginning of the row, two to mark the ascending foot wedge.
* a calculator and a centimeter measure
* and a mind with which to think. Because if you don't think, the socks will be the wrong size and you'll have to retie them, and then again. From my own experience I can tell you that it is better to turn your mind on straight away.
* Gypsy needle to close the noose
Another point to pay attention to is fullness.
The term 'fullness' in shoes should not be confused with the width of the shoe. The fullness of a shoe is defined by the circumference of the heel bone, which is the volume of the foot at its widest point. The so-called fascial line runs around the foot along the protruding bones of the big and little toes. In addition, the height of the foot should be taken into account. Based on these parameters, the fit of the shoe is calculated. The internationally recognized fit sizes range from E to I. The most common are F, G and H. F is for rather slender feet, F1/2, G for medium feet, from G1/2, H and above for full feet. You can usually find shoes in all sizes across the wide range – just ask the retailer!
Children's feet vary in size from infancy onwards.
If you choose the right size, the shoes will fit you but not be too tight. If the foot is too full, the foot slips forward and the heel slips out the back of the shoe. If the shoe is too full, it will quickly 'give'. This also has a negative effect on the toe joints as they are in a 'compressed' state.
Why is it important to choose the right fit?
If the foot is too full, it 'hangs' inwards and the toes unconsciously try to 'stay' inwards with every step, which leads to overstretching and, as a result, cramps. If the fullness is too low, the toes and metatarsals are compressed with each step, and the increased load causes not only the characteristic pain but also the foot deformity described above.
- The foot is usually smaller in the morning and increases in size in the evening. The ideal solution is therefore to buy shoes at approximately the time of day you plan to wear them in the future.
- For example, shoes for a party are best bought in the evening, shoes that you will wear all day are best bought in the afternoon.
- Never try on shoes while sitting! When we walk, our feet lengthen. Therefore, remember to walk in your shoes.
- Take your time when shopping for shoes! Never buy shoes in a hurry. Put on your shoes and walk around the store for a few minutes.
- A good shoe store has experienced and attentive salespeople. A good salesperson will always (secretly) look at your feet first. This way he can measure your feet and find the right size for you. A good salesperson knows the store's range and knows which models are narrower or fuller.
More facts about ligaments and tendons
Both the ligaments and tendons of the leg are made of collagen fibers, which are very flexible and strong. The condition of the collagen determines how elastic and resilient the tissue containing this collagen is. When the collagen fibers are damaged, the muscles, ligaments and tendons are no longer flexible, but weak and sluggish, and the legs no longer function well.
Ligaments and tendons can be stronger (if you exercise and toughen up) or less strong (if you have a sedentary lifestyle or are older). If the ligaments and tendons are thin, they may not be as strong as the thicker ones.
They are also connected to the articular surfaces of the toe phalanges. All metatarsal bones can be easily felt with the fingers because the soft tissue layer is small. However, their components are arranged in different levels. The vault they form is transversal.
The Celtic foot – a mixture of different cultures.
The Celts are associated with Western Europe, particularly Great Britain, but their exact origins are uncertain. The shape of their feet and toes also suggests a mixture of different cultures.
The shape of the Celtic foot is a combination of Germanic and Greek toe shapes. In this type, the second toe is longer than the rest, and the first and third toes are almost the same length. Genetic studies have shed light on the reasons for this combination.
The results show that the regions of the UK, such as Cornwall, Scotland, Wales and Northern Ireland, where Celtic roots predominate are genetically different. This means that there is no unified Celtic genetic group.

The Romans left their mark all over Europe and North Africa at the time of their conquest. They invented the 'foot', a measure of length still used in Britain today.
A study using DNA samples from more than 6,000 Europeans confirms this theory. According to the results, European populations migrated to modern Britain over the last 10,000 years.
The shape of the Celtic foot is possibly the result of the intermingling of several peoples.
The principle of hospital stockings
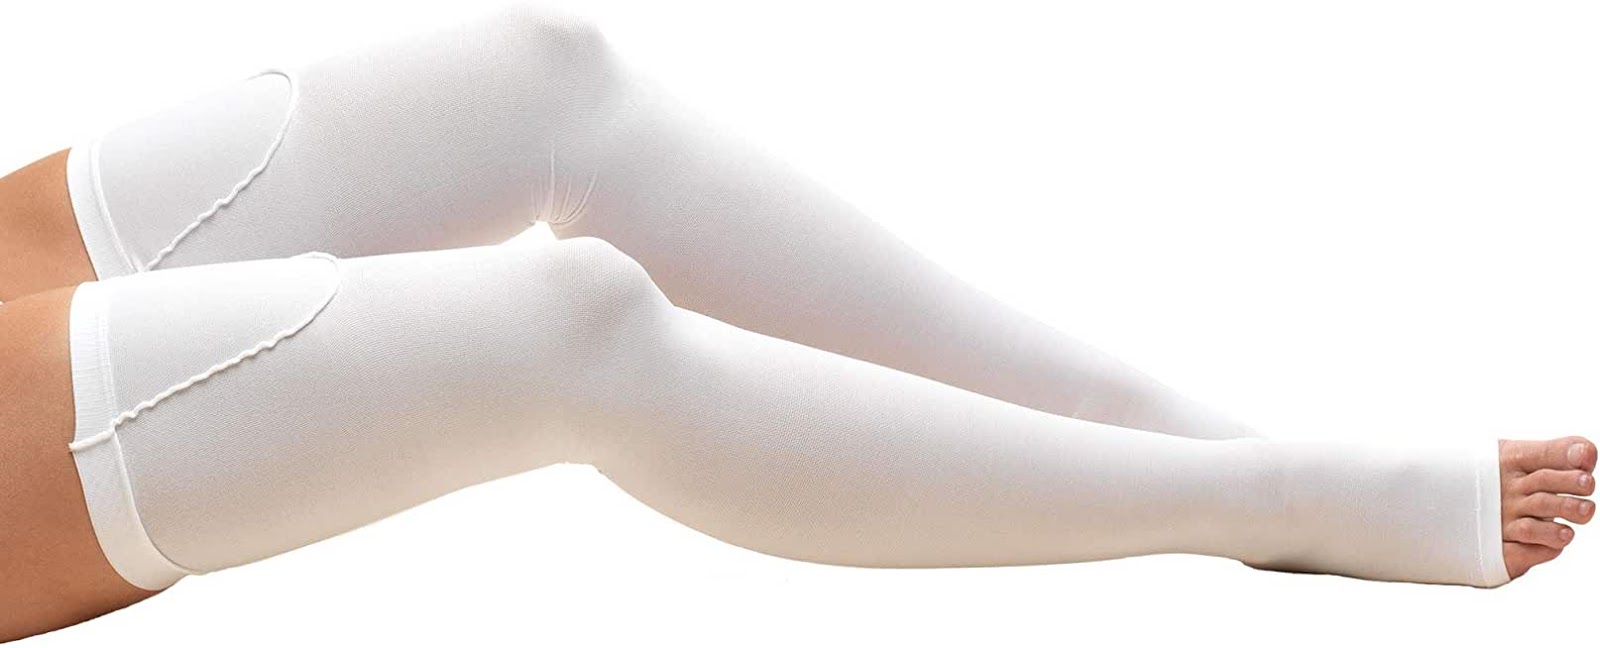
As previously mentioned, the main purpose of anticoagulant stockings before, during and after surgery is to prevent blood clots. The high risk of thrombosis during surgical procedures, whether broad-spectrum or minimally invasive, is due to a number of factors:
- damage to blood vessels, which can lead to bleeding and bruising;
- Platelet aggregation (activation and sticking together to form a platelet clot) in response to damage to the vascular wall;
- Disruption of microcirculation and tissue nutrition as a result of expansion of venous channels and capillaries;
- Prolonged (up to several months) strict bed rest, causing venous stasis in the lower limbs.
Hospital compression stockings compress the entire circumference of the operated limb, exerting even pressure on the veins, which has the following positive effects
- Narrowing of the vascular lumen, leading to increased blood flow and preventing venous congestion or malnutrition of soft tissues;
- The vessels in the limbs maintain their physiological tension, reducing the likelihood of varicose veins or aggravation of existing varicose veins;
- The risk of edema is reduced because external pressure prevents the passage of fluid into the intercellular space.
So the use of compression stockings helps to stabilize the circulation after surgery as much as possible given the extent of the damage and prevents the formation of thrombi that pose a potential risk of VTEO such as thrombosis, deep vein thrombosis, etc .
Surgical stockings versus varicose vein stockings – what’s the difference?
Some patients, inattentively following their doctor's recommendations and not understanding the basics, purchase regular varicose vein stockings instead of hospital compression stockings because they believe there is no difference between the two. However, there is a difference, and a big one.
About the choice of stocking: compression classes

The most important criterion when purchasing hospital stockings is the compression class, that is, the level of compression exerted on the limb. If the compression is not sufficient, the necessary increase in blood flow will not be achieved. If the degree of compression is too high, the vessels are overloaded.
Anti-embolism stockings come in three compression classes:
- Class I (18-22 mmHg): recommended for minor surgical procedures and for people without vascular disease.
- Class II (23-32 mmHg): Recommended for more complex surgical procedures, especially in patients with a history of varicose veins or other venous diseases.
- Class III (33-46 mmHg.) Stent): used as a last resort in patients admitted for surgery with complex venous problems.
The correct class of compression can only be prescribed by the attending physician after assessing the general condition of the patient, conducting the necessary clinical tests (prothrombin index, etc.), determining the presence or absence of concomitant diseases, etc.
How do you know the right size of surgical compression stockings?
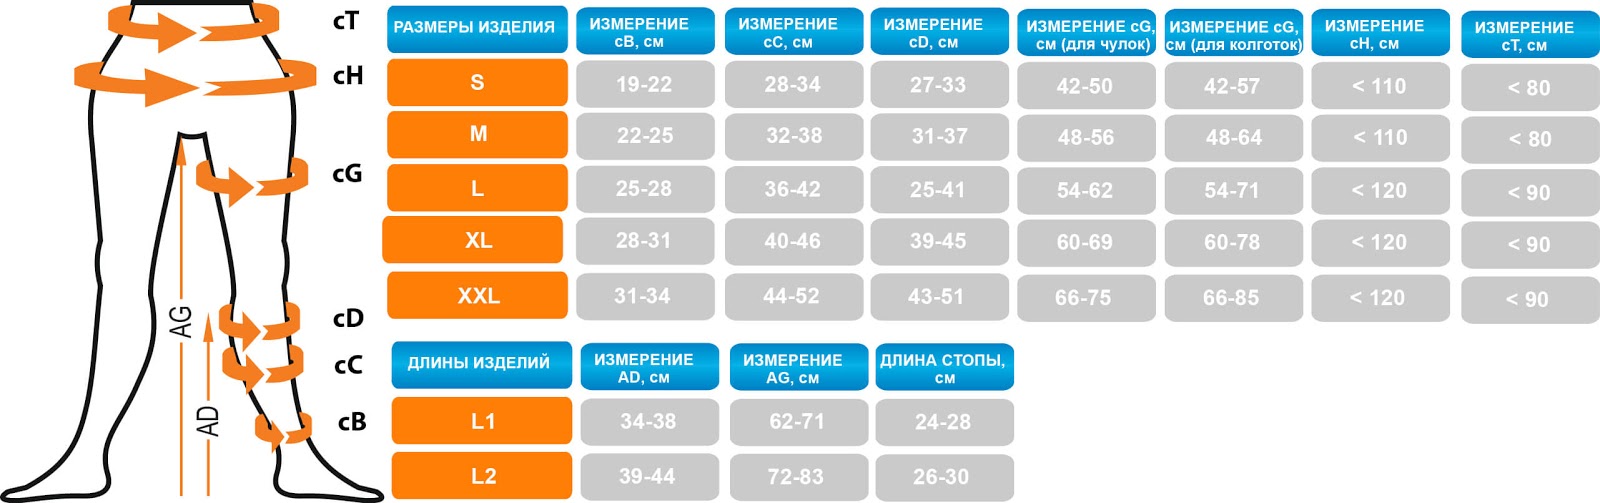
Choosing the right size of surgical compression stockings for the hospital is not difficult, considering that there is no standard size. Compression stocking manufacturers have the freedom to choose between 2 or 3 sizes and 6 or 7 sizes.
This means that when purchasing compression socks from different brands, you should always compare your leg measurements with the manufacturer's size chart. This is the only way you can find the right size of underwear and not make a mistake.
Other ways to secure the toe of a stocking by knitting
In addition to the methods mentioned above, there are several others to learn to knit this part:
All of these methods provide a beautiful appearance and increase the durability of the workpiece. Let's look at each of these procedures in detail.
Snail
This method gets its name from its appearance. It can also be referred to as a spiral closure.
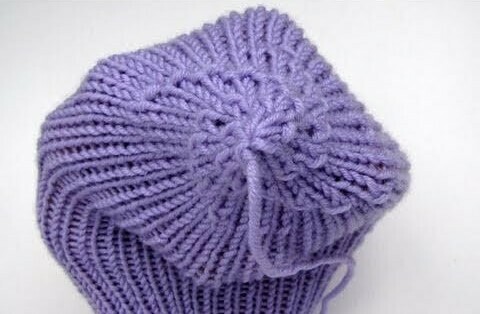
The procedure
- When you reach the drop zone, go through every second and third stitch.
- Repeat this process until there are eight stitches left.
- Pinch off the remaining stitches with the needle.
- Turn the piece inside out and secure the end with a knot.
- Cut the free thread with scissors.
TIP! A sock with this end is ideal for wearing with shoes.
propeller
The sock features an attractive pattern reminiscent of a propeller blade. This closure is particularly suitable for people with long toes.
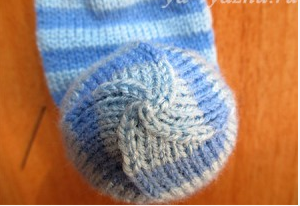
Procedure for producing the work
- Use this type when knitting with four needles. To close, the two starting stitches are knitted together.
- Then follow this procedure for the entire series. That means. In one row you knit the decorative strip, in the next row without the decorative strip..
- When the remaining stitches are about 1/3 of the total stitches, continue with each new row.
- Complete the last eight stitches as follows. Thread a double thread through the knitting needle and tighten the stitches.
- Complete on the wrong side.
General instructions
- Put the compression socks on in the morning (as soon as you wake up), wear them during the day and take them off in the evening.
- Carefully trim nails and corns (if any) before dressing to avoid pinching the tissue.)
- Turn the compression underwear inwards up to the toes and carefully hold it in your hand before putting it on.
- Stockings and tights should be worn horizontally on the thighs. Preventing swelling is the main reason why compression socks are worn while lying down.
- Both the tissue and the skin should be kept dry.


How to put on compression stockings for surgery deserves special mention. In this case, the understockings are put on on the morning of the day of the operation. The patient should not get out of bed before putting them on.
How to make it easier for yourself

With this in mind, many people ask themselves how they can make it easier to put on compression stockings. There are a number of specialist accessories available. The most important of them are:
- Special gloves. These prevent damage to the fabric and make it easier to put on thanks to the grooved surface.
- Devices to make dressing easier, including for people with disabilities.
- Special sprays that facilitate the process.
Cushioning and shock absorption
When choosing the right shoe for a 3-4 year old child, attention should be paid to the quality of the heel cushioning. Heel cushioning serves as reliable ankle support, ensures correct positioning of the heel and is a means of preventing flat feet. It is made from a single piece of rigid material at the correct height. To cushion the heel and prevent blisters, it is usually lined with a soft, flexible material. Up to the age of 3 to 4 years, the shoe must be made of cushioning material, while older children need softer footwear.
The cushioning in the sole is located under the heel area and protects the skin of the foot from micro-impulses and bumps in the road. This system makes the shoe more comfortable, makes it easier for the child to walk and prevents severe fatigue during long walks.
How often do you change your child's shoes?
It is very important that children choose the right size shoes that are not too big. A pair that is too tight or too loose can cause the foot and gait to form irregularly and cause a number of health problems for the child. Therefore, children's shoes should be changed regularly as their feet grow. It is recommended to do this at the following intervals:
- Until the age of three, shoes are changed every 40-60 days;
- for children aged 3-6 years, the size should be changed every 3-4 months;
- For 6 to 10 year olds, a new shoe is changed after 4 to 5 months.
Many parents make the mistake of saving money on shoes or boots and letting their child continue to wear other children's shoes. But you shouldn't do that because all shoes take on an individual shape under the foot. This can cause misalignment in another child, meaning the development of the foot is impaired.
When choosing the size of shoes for a child, it is important to take into account not only the shoe size in the table, but also such criteria as the construction material, the characteristics of the sole and heel, and the shape. All of this affects the formation of the child's foot and its future health.
Read more:- Making hooves for shoes.
- The socks on the big toe are torn.
- What to do if your boots pinch your toes?.
- How to break in a stiff heel.
- What to do if the sneakers pinch in the heel?.
- Shoes for problematic bony feet.
- Baby foot size chart.
- What putting your feet up means.