Alternative variant for shoe lasts
- GOST 3927-88 Hooves for shoes. General specification
- BASIC PARAMETERS AND DIMENSIONS
- § 3 – Repair of shoes
- § 4: Adjusting the shoe to size
- Does the shoemaker have shoes?
- –Tagged
- From the Dynamo Stadium to the House of Models
- Unattainable ideals
- Peculiarities of teaching technology related to the implementation of FSES
- Current problems of educational technology in the context of FGOS implementation
- Shoes with your own hands: how to make your dream shoes at home
- Begin
- Sawing, sanding, assembling.
- METHOD OF ATTACHING THE BEADS
- NAIL METHOD
GOST 3927-88
Hooves for shoes. General specification
Valid from 01/01/90
until 01/01/95*.
_______________________________
* The validity limit has been lifted.
Based on Protocol N 4-93 of the Intergovernmental Council on
Standardization, metrology and certification
(ISO N 4, 1994). - Annotation.
1. Developed and adopted by the USSR Ministry of Light Industry.
S. Sokol; DE Medzeryan, candidate of technical sciences (supervisor); TA Kalimulina; TN Rozhkova; MI Ivanova
2. approved and implemented by the Decree of the State Committee for Standardization of the USSR No. 3297 of 09/28/88.
4. REFERENCE TO NORMATIVE TECHNICAL DOCUMENTS
Name of the normative technical document referred to
ADOPTED Amendment N 1, approved and implemented by the Decree of the State Committee for Quality and Product Standards of the USSR dated 03/22/90 N 495 dated 10/01/90 and published in EMS N 6, 1990
Amendment N 1 by the legal office 'Codex' in accordance with the EMS text N 6, 1990.
The standard applies to metrically numbered wooden and plastic lasts intended for the manufacture of shoes.
The standard does not apply to lasts intended for the production of sports shoes.
BASIC PARAMETERS AND DIMENSIONS
1.1 The basic dimensions of the hoof are shown in Figure 1.
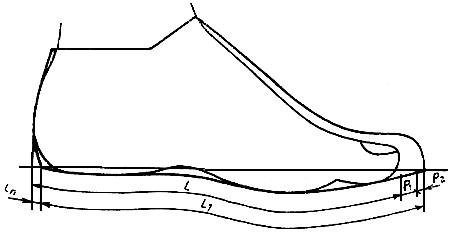
whereby
the minimum size for age groups 0, 1, 2, 3, 6, 7, 9 and for Juft women's special shoes, excluding summer shoes, without lining and moccasins, is 10 mm; for age groups 4, 5, 8 and for summer shoes, without lining and moccasins, it is 5 mm;
the circumference of the tufts, indicating fullness, mm (cut 0.68/0.72);
1.2 The numbering of the extensions corresponds to the length of the foot ().
1.3 Age-appropriate hooves should have the group, number and type of fullness according to Tables 1 and 2.
Hooves for footwear other than Juft and special shoes
(distance between adjacent numbers 5 mm)
1. It is possible to make the hooves for groups 8 and 9 with other numbers and fittings upon request.
It is permissible for the manufacturer to divide the hooves into subgroups for the women's and boys' groups:
Jufts and special shoe insoles
(distance between adjacent numbers 7.5 mm)
1 When determining the shoe group, round down to 0.5 mm.
2 At the customer's request, it is permissible to supplement the washer groups with other numbers.
1.4 Depending on the height of the heel, the shoe lasts are divided into subgroups according to Table 3.
Remarks. At the customer's request, it is possible to produce soles with a distance of 5 mm between heel heights.
1.5 The distance between adjacent paragraph lines is:
for mass-produced (casual) shoes:
1.6 Each shoe number must be made in three thicknesses: narrow, medium and wide, except for closed winter and summer shoes of groups 1, 2, 3 and slippers.
§ 3 – Repair of shoes
The correct execution of technological methods of hoof sewing largely depends on the condition of the hoof during the production process. Changes in the volume of the hoof, holes in the hoof track, wear of the wooden plugs, changes in the size of the upper areolas, the presence of cracks or chips in the wedge, failure of the clasp, etc. - all these factors have a greater or lesser impact the quality of the shoe's stitching and therefore its appearance and performance.
A warped hoof inevitably leads to an irregular and therefore inferior shoe. Therefore, the hooves must be thoroughly examined before production begins. After this inspection, completely unusable bales are sorted out and bales with minor damage that can be repaired without changing the model and its dimensions are sent for repair.
Shoe blocks with a puncture mark, worn or chipped wooden stoppers, broken locks, stops, slightly worn top pads, broken bushings, etc. must be submitted for repair.
A block mark that has punctured the tension structure is repaired in two ways.
In the first method, a groove is selected with a chisel and a strip of sole leather corresponding to the size of the groove is prepared; after the groove is lubricated with carpenter's glue or casein glue, the leather is inserted into the groove and fixed with wooden pins. Select squares in the sock into which you will insert pieces of leather of the appropriate size. Any leather parts and studs that protrude above the surface of the shoe are cut off.
The second method involves smearing all broken areas with Stabeline mixed with sawdust. Once the shoe has dried, the surface is renewed with a rasp.
§ 4: Adjusting the shoe to size
Trade fairs and workshops with tailoring services select the lasts to be measured and adapt them to the characteristics of the shoe.
To measure, trace the contour of the foot on a piece of paper using a thinly peeled pencil, held vertically and lightly touching the foot. Then measure with one centimeter (Fig. 106).
For shoes, the volume of the calves and the height of the cuffs.
Measurements must be taken on both feet. When measuring, pay attention to any anomalies in the foot; if so, they will be processed accordingly. The following foot deformities should be noted.
1. Bone protrusions (gout). If such a defect exists, leather pads (Fig. 107,a), called heel pads, are placed on the ball of the shoe. The thickness of the pad depends on the size of the gouty protuberance. It is determined by the difference between the volume of the foot and the ball of the shoe. For example, the volume of the bunion is 24cmand the volume of the shoe balls 23.3 cmPlace a 0.3 cm thick piece of leather on the last. cm thick.
2. Reinforcement of the toes On the shoe from above on the toe lining - finger cots (Fig. 107, b i v), the thickness of which corresponds to the difference between the thickness of the toe and the thickness of the shoe in the corresponding places.
3. The big toe cap. The toes of the shoe are covered by shoe inserts (Fig. 107,d). The thickness of the shoe is determined by the difference between the volume of the foot and the shoe.
Does the shoemaker have shoes?
I've actually only been in the workshop for a short time, just a few months. Before that, I learned to sew shoes and bags at home.
What does the sewing process look like at home? It's a table with a mountain of boxes filled with tools and materials stacked around it. In a closet in another room, clothes are collected and literally shoved onto several shelves, while leather, fabric and caulking lie on empty shelves. The sewing machine is in the kitchen. The leather sewing machine is a 50 kg monster and lives on a special table, but the special table with the machine could only be accommodated in the kitchen. Of course, everything in the kitchen is made of yarn. You can laboriously collect the leftovers and even roll them around the kitchen with a sticky roller after sewing, but a few threads still end up in the soup and sausage, a few get stuck on the cat and it spreads them around on its paws entire apartment, on the sofa, the bed, the coat in the hallway. Everything in threads. This is inevitable.
So the production is scattered around the rooms. Sewing a bag is a constant traipse around the apartment.
However, an acquaintance of mine claims that he has five industrial machines of various types, as well as a bed and a wardrobe, in a 15 square meter room. This is incredible Feng Shui and stinks to high heaven.
You can sew bags at home - cumbersome, but you can. But once you start thinking about sewing shoes, it's time to look for space to rent. Because you need at least one other machine to make shoes, and if you put one in your apartment, the neighbors will drag you away with pitchforks. And you're lucky if you don't see your own household in this crowd.
This machine is a grinder. It is used to process the sole, nails, prophylaxis. Generally the sole part. It has a primitive structure: a rotating shaft with a stone and a puller. A powerful puller. A puller that screams like a wounded buffalo in the middle of nowhere. The kind your neighbors don't want to hear overhead. Well, really loud stuff.
–Tagged
- Bows, hair clips, hair bands and other jewelry (57)
- Embroidery, knitting patterns (4)
- Paper dolls (4)
- Knitting for children (128)
- Women knit (151)
- House design (4)
- Dollhouses, furniture (76)
- Rabbits and kittens (79)
- Glove and Sock Toys (43)
- Toys with hooks (186)
- Needle toys (83)
- Dolls (599)
- Raeburn dolls (2)
- Peacock and MK dolls (21)
- Lydia Calambet dolls (79)
- Elena Lavrentieva master class (26)
- Things to do at home (278)
- mic by LIKMA (18)
- my works (8)
- Plush toys (278)
- New life for old things (48)
- Shoes, socks, boots (134)
- Blankets, sleeping bags, plaids etc. (84)
- original gifts, bouquets, etc. (8)
- Songs and stories (2)
- Crafts from plastic bottles (26)
- Hairstyles (9)
- Educational games for children (111)
- Recipes (145)
- Handmade (everything and nothing) (145)
- Bags (36)
- Knitting and crochet programs (2)
- Sewing for the whole family (81)
Production of insoles for shoes.MK
Link to Milena's website (http://milena.vitalory.ru/masterskaya,32.html) Materials required:
- Adhesive tape – used to make molds for pouring
- Plastic film (e.g. cling film) – base for the mold
(for an alternative version of making the block instead of tape and foil – silicone sealant + vegetable oil and plastic knife/spatula)
- Plaster – used to make (shape) the shoe itself.
- Sticks (wooden or plastic) – to help grip the shoe (you can also use something else).
- Scissors (knife) – material to be used
- Colored pencil (marker) – for marking
- Glue – for attaching the sole and strap
- Adhesive tape (paper tape) – for making the sole
- Cardboard – to form the sole
- Water putty – for customizing the shoe
- Abrasive sand (emery paper or loose sheets) – for the finish
- Wood putty (or acrylic paint) – to cover the finished shoe so it doesn’t get dirty.
- Varnish – for applying the final coat.
- Auxiliary materials – cloths, plaster mixing container, tray, etc.
From the Dynamo Stadium to the House of Models
'I was born in 1940 and lived with my parents in a barracks next to the Dynamo stadium throughout my childhood. My friends and I often gave balls to famous soccer players who were training at the stadium and they gave us money in return. I went to school, but I didn't study well - I mostly played football or hockey. In general, I was more interested in sports than school. Once, when I was in the last grade, and it was 1955, our class teacher left me after class and said: 'Tola, you won't get into the university anyway. You don't study well and all you can think about is football. And your family needs a breadwinner, so you have to get a job. I recently walked past the arts and crafts school number 64, where they are just announcing the start of school. Try applying there. In the past, the vocational school was considered a place where restless young people were sent - they were fed twice a day, dressed in uniforms and, after finishing school, assigned to work - some as wood turners, others as locksmiths. My father always told me: 'If you don't do well in school, you'll go to vocational school'. However, the school that my teacher advised me to go to had an artistic bias: it trained bricklayers, carpenters and casters, whose works were exhibited at the All-Union Exhibition of Economic Achievements. But I had never held a pencil in my hand and skipped all the drawing lessons, so the class teacher's suggestion seemed strange to me. But just to be on the safe side, I applied. An additional addition to the fashion designer coder group has been announced. This course was practically established on behalf of the state and supervised by Ryabkin, a leading specialist at the orthopedic shoe factory, which was located near the Metro Aeroport. The specialists of this factory made custom-made shoes for Kaganovich, who was then a member of the Presidium of the Central Committee of the CPSU. Kaganovich had bad feet and choosing shoes was difficult. Each time there was something about them that bothered Kaganovich, and one day he said to Ryabkin: 'If you can't make shoes for me, then what do normal people wear?'. Ryabkin then replied: 'What do you want? There are no specialists!'. There were really no specialists - the shoemakers were mostly people without special training. Although before the revolution, as our teachers told us, Russian shoemaking did not differ much from European production in terms of level and quality. We had private shoe factories and entire dynasties of shoemakers: the Stulov dynasty in Moscow and the Sorokin dynasty in Leningrad. There was a school of crafts, of art. How were shoes made back then? They were chopped with an ax, cut with a knife, planed with a rasp and finished with sandpaper. And this school was passed on to us. We were taught the way we were before the revolution, when everything was done by hand from start to finish. We could go into the forest, cut down a tree, cut a block of wood with an ax and work on it with a knife. Today no one is able to do that anymore, there is no such school anymore. This school was passed on to our graduating class and those who came after us. However, it wasn't that successful and all the graduates melted away and then the course was discontinued altogether - apparently there wasn't much demand for it. But specialists like my generation of well builders no longer exist. There were only three of us in Moscow – me, Zhenya Orlinsky and Slava Kitsis. Each of them had their own style, even though they came from the same school. But they don't work anymore, just me.'
Unattainable ideals
'I fell in love with my job. I think that came with the realization that my work was needed and liked by the people I worked with. The hardest part is making a coaster that the designer likes. When working with a designer, it's important to understand what they want, but also that what they want is both beautiful and functional. Of course, this is very difficult and sometimes conflicts arise, especially when working with a prototype and not a sketch. The designer must not only be an excellent artist, but also a shoe designer who knows exactly what the shoes are intended for. Because what's the point if the shoes are beautiful but uncomfortable? My master, who I studied with, always said: You can make bad shoes on a good shoe, but you can't make good shoes on a bad shoe. A block is like the foundation of a house: if the foundation is faulty, sooner or later it will crack, collapse or fall apart. In our industry you can't make mistakes, but you can't do everything perfectly either, because the shoe has to fit as many people as possible. So there is no perfect mat, and I don't have a mat that I'm proud of - I just don't see it as something to be proud of. Even if I finish a block and am happy with it, after a while I notice the flaws. Of course you can turn a blind eye, but we have been taught otherwise. Sometimes it even happens that I finish a job and the next day I look at the pad, throw it away and start again. The shoemaker is not obliged to design a radically new shape, he has a different task - to make a shoe that will sell in Russia, that will be comfortable and made in the same style - that is what the designers demand. And there is nothing new to invent - everything has been invented before us. Shoe factories keep a copy of each shoe model, and with such collections you get the impression that everything was already there. Even the pictures of empresses and noblewomen show that the heels, the shape of the toe, the heel - everything is the same as ours and everything goes in circles. Only time and our perspective change. The shoe also remains the same because it does not come into being on its own, but is created on the basis of its predecessors. There are standards developed by craftsmen and the shoe is not made from scratch every time. The shoemaker glues or welds new parts onto the existing insole, taking into account the positive qualities of the original and making it the way the designer likes it or how it will sell better. The result is a larger deposit. However, since my school is based on woodworking, I use the 'more to less method' - I cut the excess out of the shoe. That's my style of work and I always just use my pads, improve the bottom and keep the top.'
Peculiarities of teaching technology related to the implementation of FSES
To this discount we can add a discount for your educational institution (depending on how many of your colleagues have completed the Inforourock courses)
Currently, additional cumulative discounts (from 2% to 25%) are available for 56,357 educational institutions. To find out what discount is available to all employees at your facility, log in to your personal Inforourock account.


Current problems of educational technology in the context of FGOS implementation
To this discount we can add a discount for your educational institution (depending on how many of your colleagues have completed Inforourock courses)
Currently, 56,357 educational institutions offer additional cumulative discounts (from 2% to 25%). To find out which discount applies to all employees of your educational institution, log in to your personal Inforourock account.


Shoes with your own hands: how to make your dream shoes at home
The FURFUR editorial team has often written about people who create things with their own hands. This time we decided to abstract from the hero and the person and focus exclusively on the technology and the process of making things - in this case shoes.
To understand how the process of making shoes works, we contacted aspiring shoemaker Kim Malygin (not officially related to the model Dasha Malygin). He built a full-fledged pair of shoes and told us about the peculiarities of such work; We in turn documented all steps in detail.

 1. file 2. Needle wax 3. Beeswax 4. Tokmach 5. Collet 6. hammer 7. shoemaker
 Nails for tightening the tops of boot lasts
 Desmocol polyurethane glue, adhesive tape

 Pieces of suede for shoe uppers
 Clothing cuts made from burlap (the thickest part of cowhide).

Begin
She came to me, to my father, and said, 'Why don't you make one? I looked at the picture and it's not that hard. The most difficult thing was to find the wood for it, you need aspen or linden or birch, in a word: non-resinous wood. The only thing I could find in town was aspen and linden boards for the tubs. But the problem was that they were at most 11cm wide - we needed 14.
I had to glue them together, but that was no longer satisfactory. I made her a pillow and Dinka squealed with joy.
A few years after this event, the story began. My daughter had a friend who owned a sewing supply store. Apparently she saw my work and wanted to sell it.
I now had to seriously look for wood. I searched and called all over town. NOTHING - nowhere, as if we didn't live in the land of linden trees, aspens and birches! I was very surprised. But after a long search I came across another sawmill that was EVERYWHERE! And linden and birch and aspen, you can choose whatever you want and in any size. You don't need to buy cubic meters. Thanks to the friendly Sergey Mikhailovich (colloquially simply Mikhailich) – the owner of the carpentry workshop! I chose lime.
I even caught up with Sergey and gave some small birch logs, after I said I couldn't find anything in the city except firewood, but buying a car load of birch firewood for a couple or three logs still somehow not very much, and friends, who buy firewood and was not found. Well, I didn't find what I was looking for, maybe I didn't look hard enough... Well, that's how it is.
But now I have not only linden boards, which, by the way, have been shaped and run through the board thickness and adjusted millimeter by millimeter to the thickness I need. But also birch boards for my sailing business.
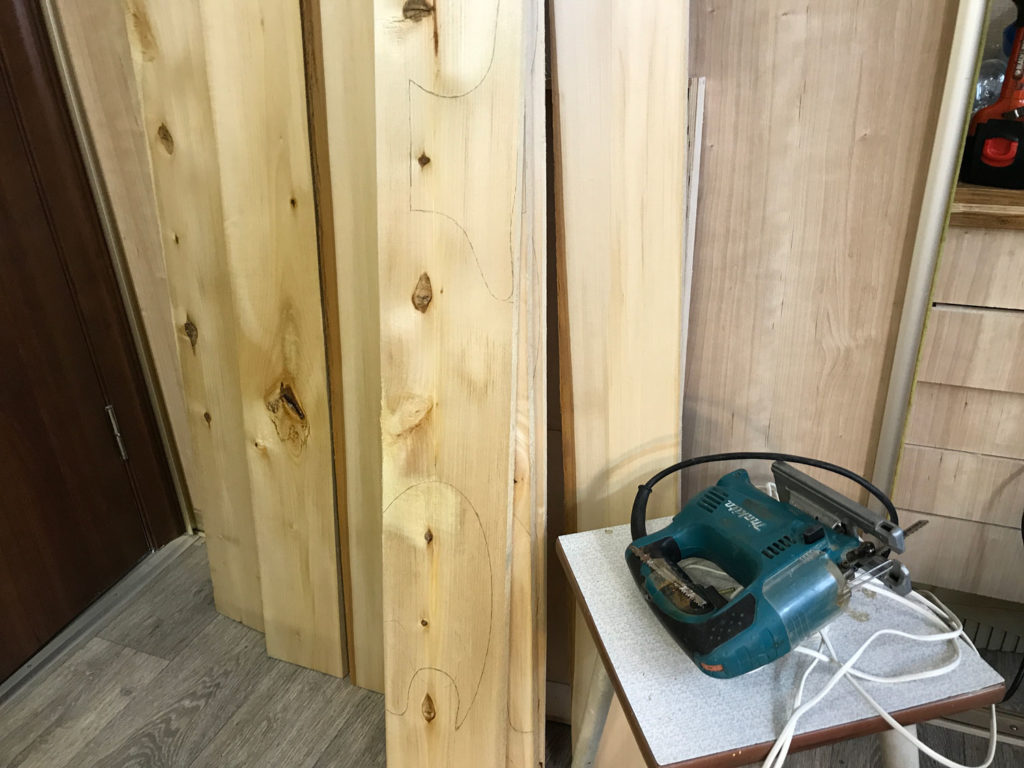
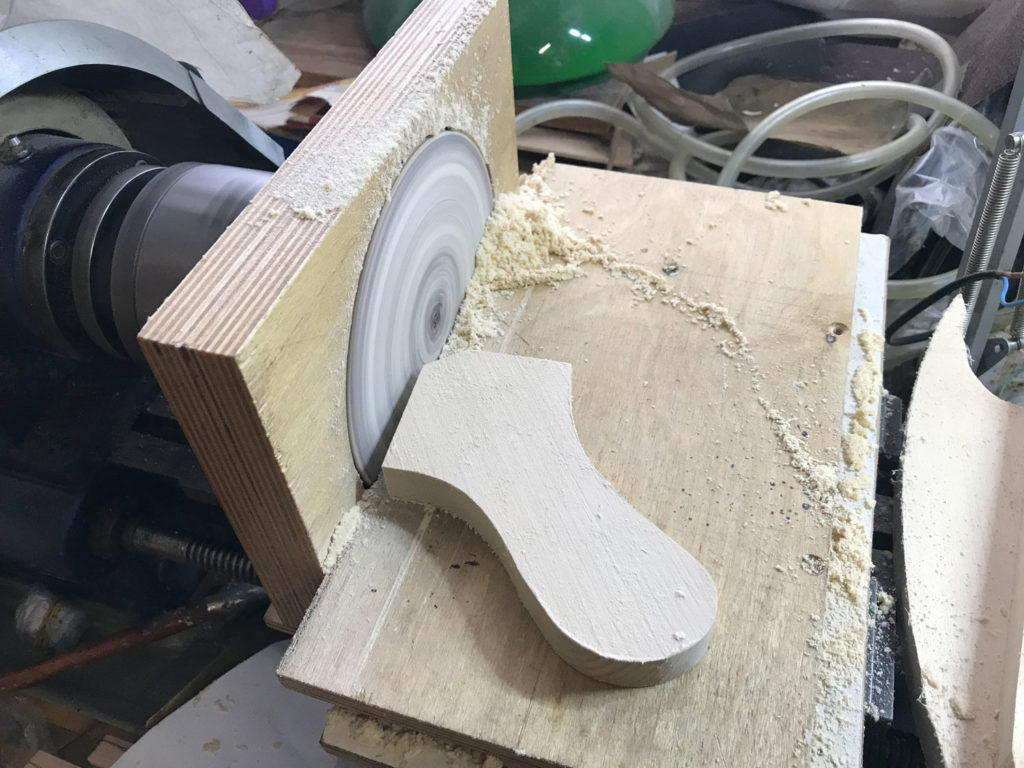
Sawing, sanding, assembling.
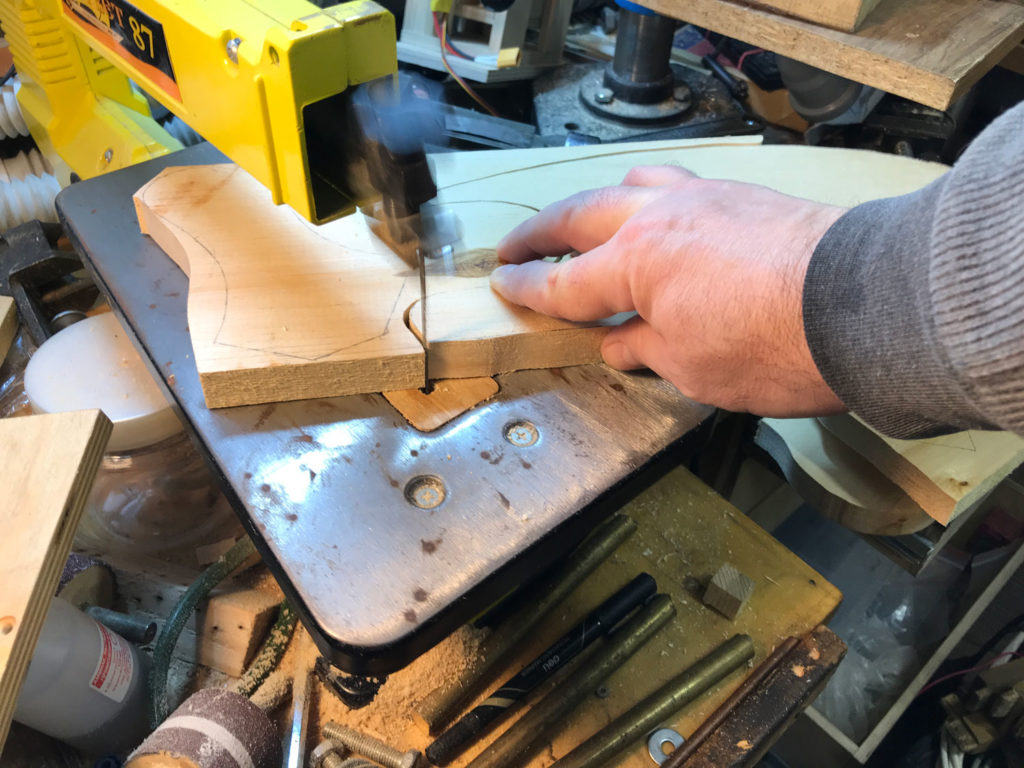
And there he is!!! The happy moment to start sawing. First I had to cut the large boards into shorter pieces, using a hand jigsaw of course, and then I used the table jigsaw to mark the pieces.
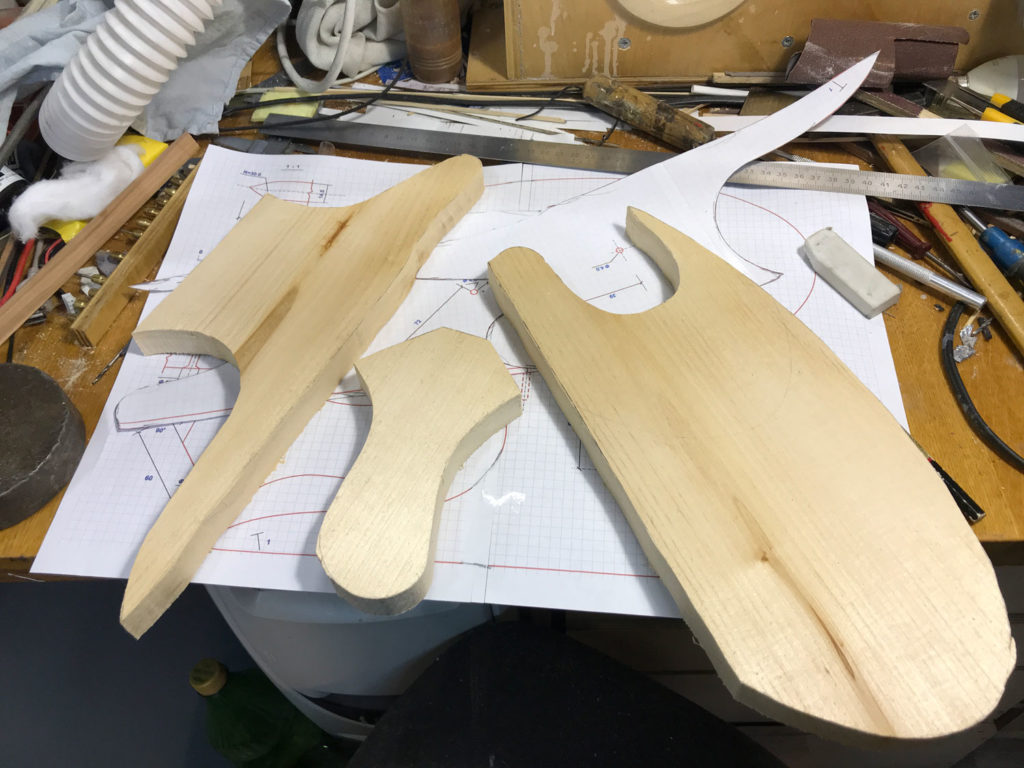
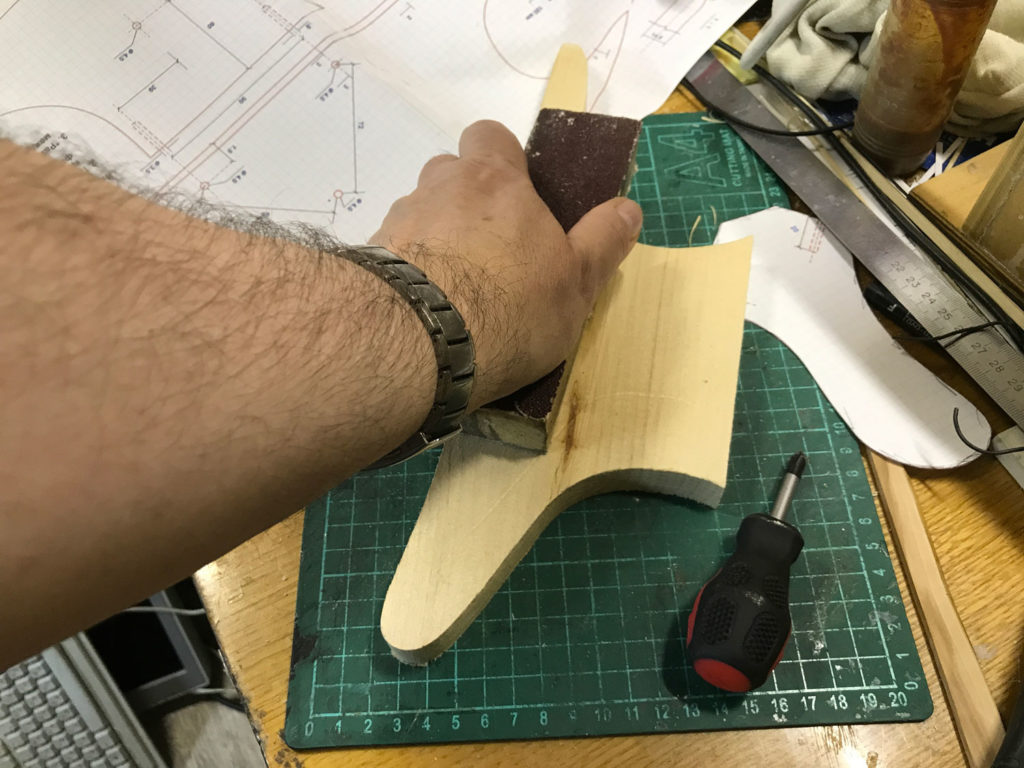
I cut out the pieces, now I just need to sand them.
We will sand the ends that are flat on a flat plane.
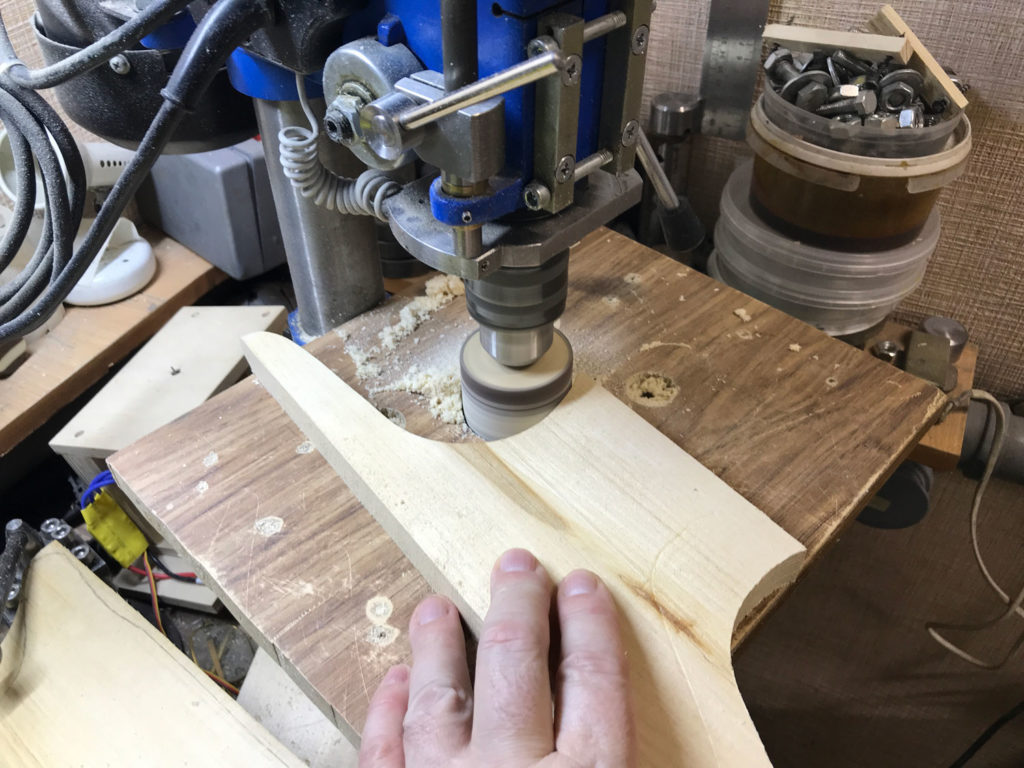
Then you are ready to assemble all the parts. Drill the holes according to the drawing.
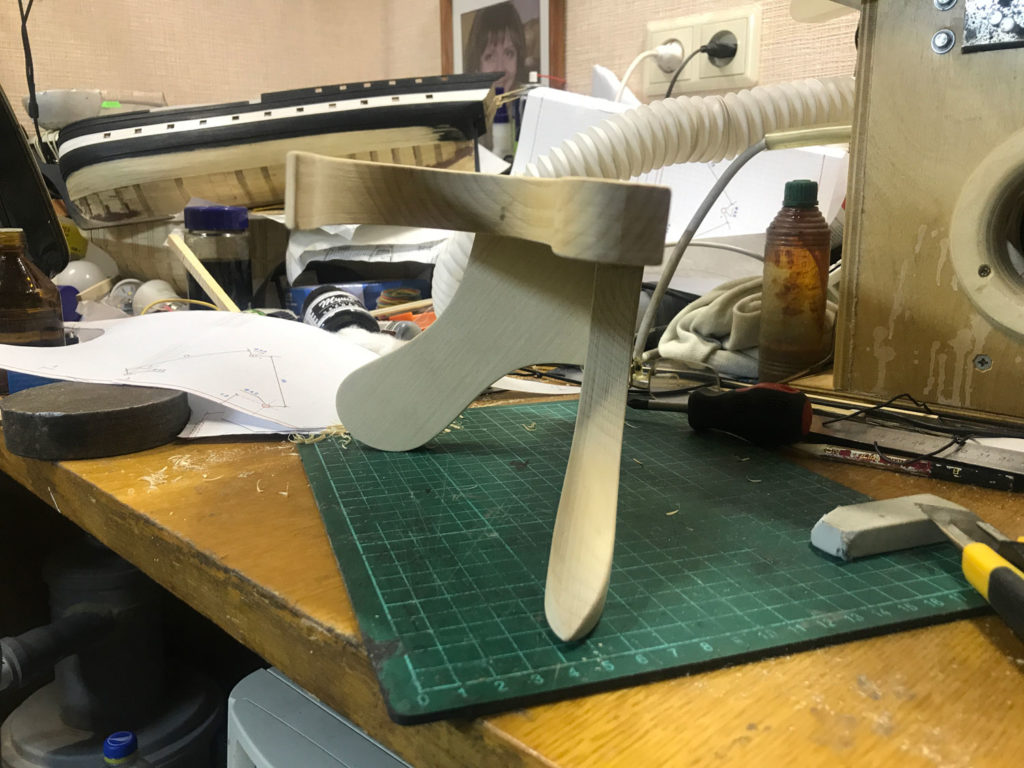
Twist all the pieces together and you have a tailor's block.
METHOD OF ATTACHING THE BEADS
The sole of a special shoe is attached with beads and seams or glue. An important advantage of the shoes is the dual method of sole attachment (gluing and sewing), which improves the performance and durability of the sole attachment.

Glued work shoes can be used universally in various industries and also in everyday life. The glued seam method is a combination of these methods. With this method, after gluing the sole to the upper, it is additionally sewn with strong threads on special devices. This fastening method has advantages over the nailing method. The absence of nails in the sole eliminates the possibility of sparking, which is important when working with explosive and flammable materials, and also significantly reduces the risk of electric shock. Glued boots are lighter and the sole is more flexible.
The shoe is made from natural juft or a combination of juft and canvas. The sole and heel are reinforced with two-layer granite. Winter insulation can be made of fabric, faux fur or natural fur. All boots have passed certification tests and received certificates of conformity in accordance with GOST 5394-89.
NAIL METHOD
Sole nailing is a proven and well-known cost-effective work shoe. The method of nailing soles and heels is the oldest and most reliable fastening method.
The shoes made using this technique are particularly durable and wear-resistant. Many manufacturing enterprises in various industries and agriculture prefer to purchase such shoes for their workers, as they are the most reliable and cheapest.

The essence of the nailing method is that the upper is connected to the sole and heel with nails. The soles and heels are made of rubber. Steel or brass nails of various sizes are used for fastening. The heads of the nails must penetrate the rubber sole by 1-2 mm. The nails run vertically through the thickness of the material being fastened and their ends should be bent 2 – 4 mm into the foot. The material of the nail also affects durability, e.g. B. a steel nail is subject to internal influences such as corrosion, while a brass nail is not subject to corrosion and thus extends the service life of the special shoe.
The nail shoe consists of nail systems in a clasp or a clasp+kirz combination with an insert reinforced with granite (50J) or metal (100J). Soles with oil and petrol resistant, heat resistant and acid and alkali resistant properties are also possible. Temperature range for oil and petrol resistant soles from -30°C to +70°C, heat resistant soles up to +200°C. Winter insulation can be made of fabric, artificial or natural fur.
All boots have passed certification tests and received certificates of conformity in accordance with GOST 5394-89, 28507-90, 12.4.137-84.

- Making hooves for shoes.
- insoles for shoes.
- Manufacture of shoe inserts.
- Manufacture of soles for shoes.
- Mortar for soles.
- The sole in the shoe is responsible for.
- Shoe making workshop.
- Manufacture of orthopedic insoles for children.