In January 2020, my husband underwent right hip replacement surgery at FNKC MFBA in Russia. He was operated on by orthopedic traumatologist Denis Sergeyevich Yakushev. The operation went perfectly, in just 1 hour. 10.

- Ringlet redness
- symptoms
- How to draw feet: a simple variant with geometric figures
- How to draw feet: step by step instructions
- Uncle Styopa and the Dwarf Nose: Where can you find the 'golden mean'?
- Let's start drawing!
- Basic standing exercises
- General guidelines for the treatment of flat feet
- Sources
- How to Draw Human Feet Step by Step - Drawing Human Feet Step by Step.
- Step by step instructions for drawing feet
- What you need to know about flat feet
- First-class care: what modern diapers can do
- Physiotherapy for flat feet
- What does classical choreography involve?
- There are 6 different positions for the feet:
- Foot anatomy and nerves
- Causes of Morton's neuroma
- How to draw feet
- How to draw eyes
Ringlet redness
Erythema annulare is a skin disease of the erythema multiforme type in which ring-shaped patches and lesions appear on the skin. Skin color changes to red, light pink or bluish. Depending on the background of the disease, swelling, localized fever and other symptoms may occur. The discoloration of the skin is caused by the expansion of the lumen of the blood vessels penetrating the connective tissue and the associated blood stasis.
Depending on the cause of the disease, there are different forms of erythema annulare:
- Erythema migrans (Erythema darius centrifugalis) – mainly affects middle-aged men, less often children and older people; is classified as an infectious-allergic phenomenon;
- Erythema migrans (transmissible erythema migrans) – an infectious disease caused by the bite of a tick infected with the Borrelia bacterium;
- Erythema rheumatica or erythema annularis, one of the symptoms associated with rheumatic fever, which often occurs in children and adolescents.
Erythema annulare can manifest itself as:
- in the exfoliative form – with scaling of dead skin at the edges or on the entire surface of the spots;
- in the vesicular form – with small fluid-filled vesicles that appear on the edges or on the entire surface of the spots
- Garland form, with the mildest course, characterized by pale pink spots that appear in chains or garlands and disappear after a few days;
- in microhirlitic form, with small spots up to 1 cm in diameter, sometimes accompanied by scaling or blistering, with a long course.
Other, very rare forms of erythema annulare, e.g. B. the telangiectatic erythema, the purple erythema or the erythema thickens, are mentioned in the medical literature.
symptoms

The main symptom of the disease is a characteristic cutaneous erythema in the form of irregular rings with a pale border that stands out from the surface of the skin. In erythema centrifugale dardieri, these usually occur on the skin that is normally covered by clothing - the back, stomach, chest and forearms. Erythema dardieri after a mosquito bite is a single spot that spreads from the site of infection and in its final form can reach 20-25 cm in diameter. The spots may be accompanied by itching or burning. With the rheumatic form of the pathology, there are no complaints.
Only a doctor can accurately diagnose the disease. Don't delay in your consultation - call +7 (495) 775-73-60
How to draw feet: a simple variant with geometric figures
This method is the most understandable and straightforward, even for beginners. It is based on a few simple geometric shapes. Before you start, you should familiarize yourself with the structure of men's and women's feet:
- Men are naturally stronger and more muscular, while women are softer and weaker. Consequently, some women's legs are strong and large, while others are slim and shapely;
- Women's curves are softer and rounder, while men's are more rough and angular;
- The upper part (thigh area) is different: the upper part of women is larger than that of men.
Step-by-step instructions:
- Measure your proportions. These depend on factors such as age and gender. The leg lengths of adults and children differ significantly, so this point is important.
- Determine the direction
- The leg is not a straight stick, remember. By using ovals and circles you can get curves and bulges for this part of the body. You can also define the relief of the muscles more precisely to increase naturalness.
- Draw the main muscles and curve lines more clearly.
- Use hatching to create shadows on the inner thigh and side of the buttocks. This contrast gives the drawing more volume and liveliness.
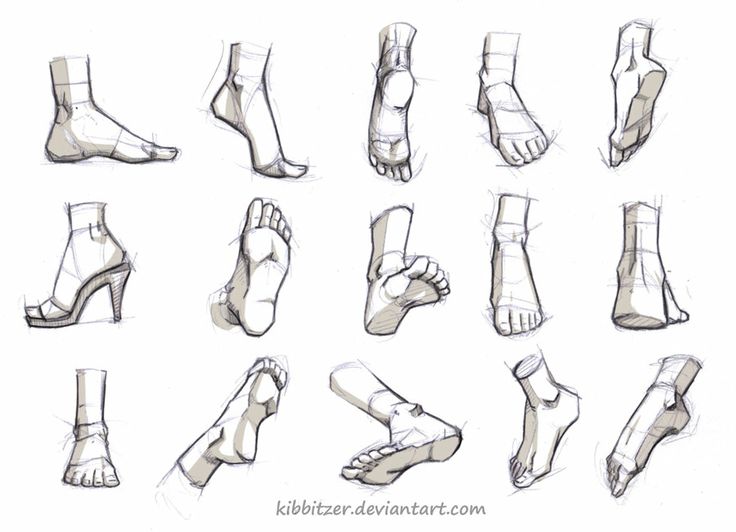
How to draw feet: step by step instructions
Without going too much into the anatomy, it's important to remember a few basic principles:
- The foot is not completely flat. It resembles a vault, so don't forget about the natural curves when drawing it;
- The line from the heel to the little toe is also curved: the ankle, the heel and the arch of the foot;
- The fingers are not completely on the floor: the thumb is parallel to the surface, the others are lowered to the floor.
Step-by-step instructions:
- Draw a basic shape - a flattened, elongated egg on one side.
- Adapt to the natural shape by creating asymmetry on the flattened side.
- We need to represent the volume. To do this, we draw a flattened, curved pyramid with rounded edges. The apex is moved towards the heel: this is where the leg-foot transition is located and the ankle is formed.
- The toes are added. These can be drawn separately from the main shape (the foot). Alternatively, guides are drawn to define the shape of all toes.
- Work out the arch of the foot and add the ankle.
It is also common to take the triangular wedge prism as a base and use it for the shape of the foot.
Uncle Styopa and the Dwarf Nose: Where can you find the 'golden mean'?
The first thing that catches your eye when you see a man is his height. In the visual arts, the reference unit for their measurement was the head. Several standards for this approach have now emerged.
The first of these is the normal proportion. This type of proportion is used in academic painting. It includes 7 'heads'. The second, not far from it, is the idealistic norm. It consists of 8 'heads'. It is used in practice by the vast majority of contemporary artists. We will call it the 'gold standard'. Using this approach, it is quite easy to divide the human body into the eight equal parts that we discussed above.
The next two types are also quite interesting - model and heroic. The former consists of eight and a half 'heads' and the latter of nine. The people depicted actually look like catwalk models or mythical heroes of gigantic stature. Take a closer look at each method and experiment with it. The look you get will be noticeably different. This will help you learn the technique and figure out which method is right for you.
Let's start drawing!
We will work out the rest of the proportions little by little. So mark on a piece of paper the points where the head and heels of your future human will be. Draw a vertical line between these points and divide it into 8 equal parts. The first line should be at the level of the chin, the last line at the level of the feet. The height of each part, as we remember, is the head. The distance between the furthest points (shoulders) is equal to the height of 2.3 of the head. Divide the vertical line you have already drawn in half. The following key points should also be taken into account:
- The width of the waist is equal to that of the entire head, with men having a smaller width than women;
- The elbows are at the level of the belly button and the toes reach to the middle of the thigh;
- the hips are narrower than the shoulders;
- the female torso is rounded while the male torso is trapezoidal and angular;
- the arm is the same length from the elbow to the fingertips as the leg from the knee to the heel;
- the neck is not cylindrical and therefore tapers downwards, and the transition from the neck to the shoulders should be trapezoidal;
- Don't forget about the natural curves of the body!
To understand the last point well, take some time to study the muscle groups of the human body. These do not make us look like flat geometric figures, but have smooth and beautiful contours. The proportions of the human head are also used to calculate the length of the feet and hands when drawing. A man's sole and a woman's palm occupy a larger and smaller part of the head, respectively.
The proportions of the human face are measured by the length of the index finger when drawing. This corresponds to the height of the ear, the distance between the pupils, from the inner corner of the eye to the outer edge of the other eye, from the chin to the tip of the nose, from the eyebrows to the hairline. Of course, it is difficult to cover all the nuances of drawing the human figure in one article. And a lot comes with experience, so go in that direction. Don't be afraid to try and make mistakes, the most important thing is willingness and then you will succeed!
Basic standing exercises
The standing position is a good starting point for the following exercises:
- Stand on your tiptoes and stretch your entire body.
- Stand on your tiptoes and shift your entire body weight to the outside of your feet.
- Stand on the outside of your feet and remain in this position for 30 seconds.
- Squat down keeping your feet on the floor.
- Rotate each foot alternately left and right, keeping feet on the floor.
The total duration of the exercise is 20-30 minutes. It is possible to do the exercise twice a day for 10 minutes each time.
General guidelines for the treatment of flat feet
In addition to therapeutic exercises, the patient with flat feet is recommended physiotherapy and massage. Tonic baths with sea salt, chamomile tea and pine needles have a restorative effect. After the treatment, it is worth rinsing your feet with cold water. Baths can help reduce swelling. Aromatic baths with turpentine or mustard are recommended, as they promote blood circulation in the muscles and increase the number of functioning capillaries.
Shockwave therapy is considered an effective physical therapy treatment for flat feet. It relieves pain and other symptoms of the disease, eliminates inflammation and swelling, reduces foot deformities and slows down the development of pathology in its early stages. Shock wave therapy improves local blood circulation, increases physical strength and the strength of ligament tissue.
Paraffin and ozokerite applications on the soles of the feet and the upper part of the lower legs are beneficial. Their temperature should not exceed 50-55 degrees. A course of 10 treatments is sufficient.
If the flat feet are due to disorders of the nervous system, physiotherapy with lymphatic drainage is indicated. It is aimed at suppressing the activity of the source of pain and improving the trophism of the nerve trunks. The duration of the session is 10 minutes. A course of 10 sessions is included.
Magnetic therapy has been proven to be effective for flat feet. It stimulates blood circulation. A solenoid inductor is attached to the patient's feet and emits a magnetic field. The duration of the treatment is between 20 and 30 minutes. The course of treatment consists of 12 to 15 sessions.
If conservative treatment does not help, the doctor prescribes surgery. It is most often performed for grade III flat feet when the patient complains of persistent pain and deformity of the big toe.
Sources
'Exercises when playing sports with flat feet'. NA Justus, IS Moskalenko, YI Shulgov, 2017.
'Classification of techniques for correcting flat feet in children using physical education'. AV Gaskov, NV Kazantseva, 2014.
How to Draw Human Feet Step by Step - Drawing Human Feet Step by Step.
The foot is the part of the body that allows us to stand, walk and run. Because the foot is so important to our daily lives and even our survival, it is no surprise that this humble part of our anatomy has long played an important role in human culture.
For example, many cultures have norms about when feet should be covered or uncovered. Across Asia, it is generally considered impolite to wear shoes indoors or other private buildings. In America, Europe and elsewhere, people go to great lengths to cover their feet with sophisticated shoes, even if those shoes are uncomfortable.
'Foot' is still a common indicator, particularly in the United States. The 'foot' has been used since ancient times; its exact length varies, but usually the length of the physical leg is taken into account. So a distance can be measured by walking with one foot directly in front of the other.
Many colloquial expressions contain the word 'foot'. 'To put your foot in it' means to say something you didn't mean and has been used since 1942. 'Put your best foot forward' was first used in 1849, and William Shakespeare used a similar phrase in 1596. The term 'footloose', meaning 'free', was first recorded in the 1690s.
Of course, feet also appear in art when people are the subject. Do your drawing skills need a pedicure? Learn how to draw realistic feet with this easy step-by-step guide.
To draw feet, all you need is a pencil, a piece of paper and a good eraser. For each step you will see an illustration and an explanatory text. New lines added in each step are highlighted in blue, while lines already drawn turn black. In a few steps you will erase lines. When you're finished, you can color your drawing with pencils, crayons, markers, or paints.
Step by step instructions for drawing feet
1 Start by drawing a series of parallel, vertical and slightly curved lines. One line should be longer than the other. This line forms the ankle and lower leg, which is attached to one of the legs.
2) Draw a second series of curved, vertical and parallel lines that form a mirror image of the first.
3) Draw a circle connecting all parallel lines. This will outline the ankle and help you draw the rest of the foot.
4 Draw two curved lines from the circle outlining the top and bottom portions of the foot. Note that the bottom line contains a sharp curve pointing toward the heel of the foot.
5 Draw a series of curved lines extending from the second circle, forming a mirror image. This outlines the top and bottom of the other foot.
6. Connect each foot with a curved line.
7. Determine the shape of the feet and ankles by making the curved lines turn into circles. Then add the toe details to the top of the foot. Draw a curved U-shaped line for each toe so that the lines connect and intersect.
What you need to know about flat feet
A normal, healthy foot has three points of support: the heel and the heads of the first and fifth toe bones. If this position is disturbed, the foot can no longer adequately cushion the body during movement. As a result, the spine and joints suffer, and scoliosis, arthritis and other diseases occur that reduce the quality of life. It is important to treat flat feet early.
The cause of this condition is weak muscles in the foot that cannot shape it properly. The bones begin to deform. If treatment is delayed, it will be very difficult to return the foot to its normal position in adulthood.
Parents should know that flat feet can only be diagnosed after the age of five. However, a visit to the orthopedist should take place much earlier. The doctor can detect bone deformities and the first signs of rickets, as well as determine the correct posture and gait. This is very important for the health of the bones and muscles of the foot.
To prevent the development of flat feet, the child should be physically active and wear comfortable and correct shoes with an insole and a firm back. At the first signs of the disease, you should see a doctor and start physical therapy.

First-class care: what modern diapers can do
Physiotherapy for flat feet

Physical therapy for children with deformed feet is carried out in the form of games. Good results are achieved:
The LFC exercises should become more difficult and faster as your fitness increases. The child should learn to hop on different parts of the foot and walk on the outside and inside of the foot. Such activities strengthen the muscles and ligaments of the foot and shape its correct position.
At the age of 5-6 years it is easiest for a child to regain foot health. It is important that the child understands why he is being treated and that he enjoys the exercises. If we correct the position of our feet at a young age, we don't have to worry about flat feet later.
It should always be remembered that any intervention to correct foot position should be supervised by an orthopedist. Only he or she can select the appropriate LFC exercises and their load. They can be carried out in a special LFC room or at home. Exercises should begin with a general warm-up and only then move on to specific exercises. The frequency of exercises is 2 times a day for 15 minutes each.
What does classical choreography involve?
The system is based on closely coordinated leg and arm positions, head and body positions. These fixed poses are linked together by main types of movement.
The pinnacle of classical dance is ballet. It is a spectacular art form that combines movement, music, costumes, set design and action.
Classical dance training begins at the ballet barre. Exercice a la barre (from French 'exercise at the easel') aims to develop the hip joints, stability and balance of the body in space on the half fingers and pointe shoes by practicing basic positions and movements. After practicing the moves at the easel, the dancers move on to practicing the moves in the center of the gym. Here they apply all the skills they have strengthened during the session at the easel.
Foot positions in classical choreography
There are 6 different positions for the feet:
- First position: Feet are in line, heels together and toes apart. This position requires strong extension of the legs to ensure the position is stable;
- Second position Is a derivative of the first position. One of the legs is moved to the side so that the distance between the heels is equal to the distance of the dancer's foot. The toes of the feet continue to point to the side;
- Third position – Universal in choreography. The heel of the right foot is aligned with the center of the left foot and the toes point to the side;
- Fourth position The fourth position is taken by bringing the right foot forward and placing it parallel to the left foot. The legs are held in an inverted position with the heel and toes facing each other;
- Fifth position. The right foot is placed next to the left foot. The right toe is placed next to the left heel and vice versa;
- Sixth position.The sixth position is actually not a reversal position. In this position, the feet are parallel to each other, heel to heel and toes to toes.
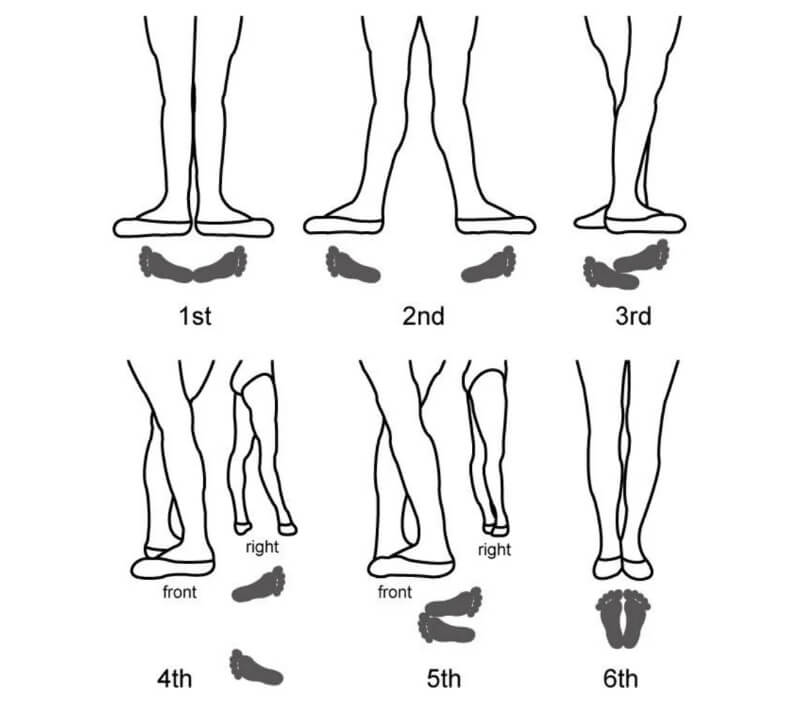
The foot positions (first to sixth) follow one after the other, with one foot position flowing into the other.
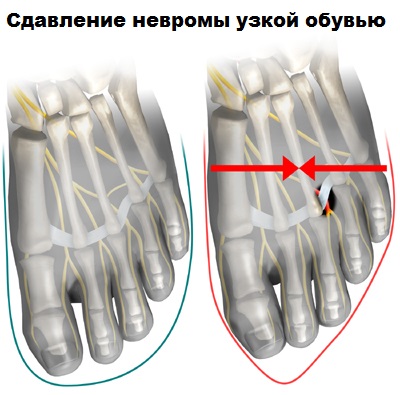
Foot anatomy and nerves
The main function of the foot is to provide support to the human body during movement and to evenly distribute the load. The foot consists of three parts – forefoot, hindfoot and midfoot.
The foot consists of three parts – forefoot, metatarsal and metatarsal.
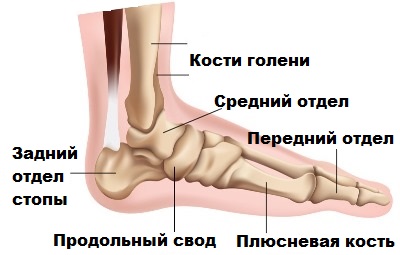
The bones of the foot, which form the transverse and longitudinal arch, are connected to each other by ligaments. The forefoot is the largest part of the foot and consists of the toe bones and the metatarsal bones, which form the transverse arch and between which nerves run. In this case, Morton's neuroma affects the forefoot.
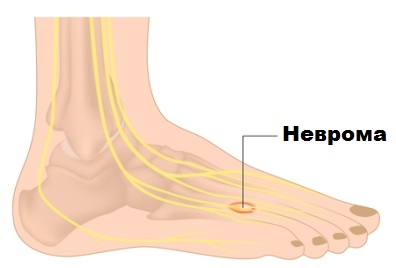
In flat feet and other foot conditions, the nerves that run between the metatarsals are vulnerable to injury from moving bones.
Causes of Morton's neuroma
A nerve located in the space between the toes begins to compress, eventually leading to the formation of a nodule or neuroma in that area.
The gradually enlarging knot, located in the already narrow space between the toe bones, begins to be subjected to even greater pressure.
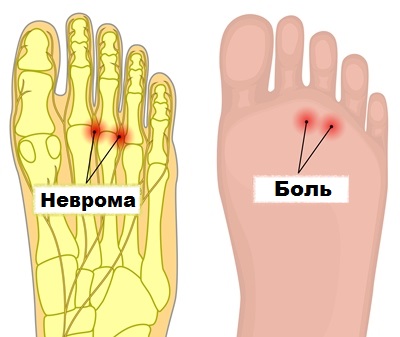
The use of tight (for example, modeling), footwear that compresses the foot and excessive physical activity are additional factors that contribute to the development of the disease and increase the severity of the pain syndrome.
How to draw feet
As in the first case, it is important to know the anatomy of the foot clearly before starting to draw.
The structure of hands and feet is somewhat similar, but the proportions are different.
The length of the foot usually corresponds to the length of the head of the person you are drawing. The foot consists of two parts – the heel and the metatarsal (the part that connects to the toes). The upper part of the foot sticks up. The peroneum, which is located on the outside, is always lower than on the inside. The bottom of the foot is curved and not flat. The big toe is always drawn parallel to the ground, all other toes are drawn downwards.
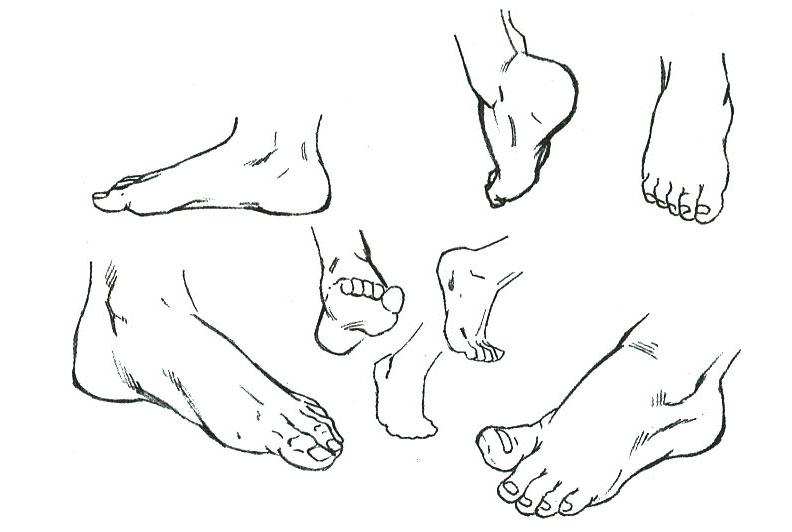
Another note: If you draw the foot from above, the toes will be longer than if you draw the foot from below.
The bottom of the nail is in the middle of the upper joint, the width of the nail is longer than its height. The thumb is as wide as the second two fingers.
How to draw eyes
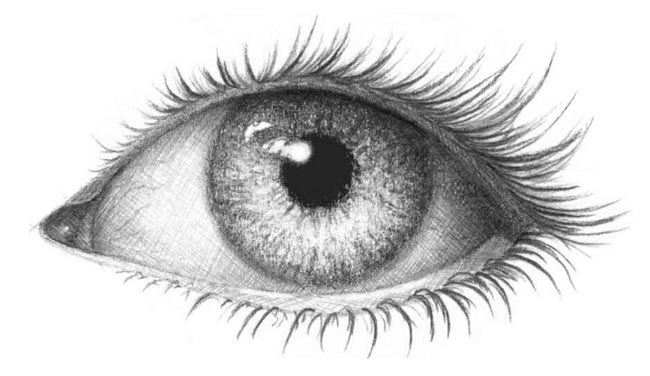
If your goal is to draw portraits, then the eyes need to be very pronounced. The look is the first thing to convey when drawing eyes.
The first thing to do is draw the shape of the eye. Later, when drawing portraits, this step will take a lot of time because a wrong shape can spoil the whole drawing.
After this step, outline the cornea. Instantly apply reflections to the pupil. Don't leave out any detail you see. The iris of the eye should not be completely round. It is cut off from below and above by the eyelid. The iris that comes under the upper eyelid will always be slightly darker. The rest of the darkenings and reflections depend on what you want or who you are drawing.
Darken the whites of the eyes. The shadow should be slightly darker at the edge.
The eyelashes are drawn as the last step. They are thicker at the base than at the end. Make sure that the eyelashes are slightly in front of the eye.
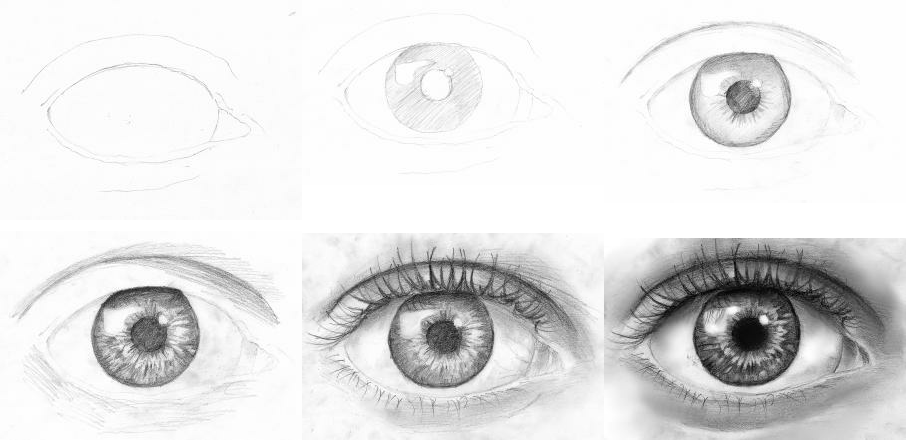
Finally, I would like to point out that practice is the most important thing. Start with something simple and increase your skills over time.
Draw with us and get inspired.
Read more:- Outer malleolus of the right tibia.
- Description of the human foot bone.
- Ankle strap at heel.
- X-ray of the foot.
- Front lower leg area.
- foot of phot.
- arch of foot.
- Photo of a teenager's leg.