After an amputation, the skin on the residual limb is very sensitive. First with warm hands and later with a terry cloth glove, a soft brush or a massage ball, the increased superficial sensitivity to pain should be reduced by gently and correctly massaging the residual limb.
- use of the prosthesis
- Care of the prosthesis
- Recommendations for fitting your tibial prosthesis
- Medical and social criteria
- Criteria based on the general condition of the patient
- Criteria based on the condition of the stump
- Criteria derived from prosthetic experience
- Post amputation residual limb conditions include:
- Movement therapy after amputation
- How to prevent the development of complications?
- assessment of the stump
- method of stump formation
- prosthetic care
- Use of cast inlays
- PREVENTION AND TREATMENT OF HIP CONTRACTURES
- PREVENTION AND DEVELOPMENT OF CONTRACTURES IN THE KNEE JOINT
- Possible complications related to the manufacture of the inlay
- questions and answers
- Steps for placing crown inlays
- Peculiarities of products from different raw materials
use of the prosthesis
The prosthesis is equipped with a foot adjusted to the specific weight of the patient and the height of the heel, so an arbitrary change of shoes with different heel heights is not allowed. Otherwise, the stability and support of the prosthesis as well as the even distribution of pressure on the surface of the residual limb in the prosthesis socket will change.
The prosthesis can be used throughout the day. The volume of the residual limb may change during use, which is more common in first-time prosthesis wearers with residual limb soft tissue atrophy. If this is the case, the number of tears on the residual limb should be adjusted (four wool patches are supplied after the prosthesis is made). During the use of the prosthesis, the total number of sutures should not exceed four - this is the ideal condition. If more sleeves are needed, it means that the soft tissues at the residual limb have atrophied and the disabled person must visit a prosthesis fitting company to have the acetabulum replaced.
Care of the prosthesis
The person must be able to use the prosthesis and perform the necessary self-care with the prosthesis. In the case of primary prostheses, instruction in the use of the prosthesis should take place in the inpatient area of the orthopedic department.
The prosthesis also needs daily care. The inside of the hip socket should be wiped with a damp cloth to remove skin particles and sweat.
A clean inside of the hip socket avoids skin irritation.
If an inlay (silicone cover) is used, ensure the cover is cared for daily according to the instructions for use provided.
- Do not store the prosthesis in a damp place or near heaters or heating devices to avoid deformation of the acetabulum.
- Avoid hard impacts on the prosthesis and prostheses, do not lift or carry heavy weights in excess of the permissible load on the prosthesis and foot parts. Exceptions are working prostheses that are specially designed for work.
- The inside of the plastic sleeves should be cleaned regularly (at least 3 times a week) with a damp cloth and soapy water and dried thoroughly.
- The outside of the plastic sleeves should be wiped down with a damp cloth and soap solution at least once a month. Braided fasteners (over-the-shoulder aids) should be cleaned with a brush and soapy water once they become dirty.
- The worn metal parts of the prosthesis and the joints should be checked every 1 to 2 months and lubricated with machine oil or technical petroleum jelly. These measures protect the joints from rapid wear and make it easier to use the prosthesis.
- Wool and silicone fabrics should be kept clean by timely washing.
- Should the acetabular cup become loose during use of the prosthesis, use the 4 sleeves provided with the prosthesis. Should the 4 sleeves loosen on the residual limb, contact your prosthesis dealer to adjust or replace the socket. For medical reasons, the shaft may be replaced a maximum of three times a year (in the case of therapeutic aids).
- For foot care
Recommendations for fitting your tibial prosthesis


Our specialists will contact you as soon as possible and advise you on any issue that interests you
© 2023 'Moscow enterprise for prosthetics and
orthopedic company
'Chelyabinsk branch
data protection
Medical and social criteria
– Transfer to a new progressive prosthetic-orthopaedic project;
– The relationship between the degree of disability and the quality of prosthetic and orthopedic care was established;
– A causal relationship was established between worsening disability and inappropriate prosthetic fitting.

Criteria based on the general condition of the patient
– condition with concomitant cardiovascular, respiratory and urinary diseases;
– Loss of mobility due to prolonged (more than a year) mobility without a prosthesis;
Criteria based on the condition of the stump
– Presence of two or more amputation defects of the limb;
– combination of one or more amputation defects of the limb with fractures of the long bones, pelvis, spine;
– Diseases and malformations of the residual limb;
– Congenital defect of a limb requiring a prosthesis;
– After reconstructive and reconstructive surgeries on a residual limb;
-after reconstructive amputations on the residual limb.
Criteria derived from prosthetic experience
– Unsuccessful attempt with one type of prosthesis;
– Failed attempt to adjust primary prosthesis;
– Need for custom-made prosthetic modules, with the exception of the acetabular cup.
When determining the indications for primary prostheses of the tibia and femur, the most responsible approach possible is necessary. In prosthetic first aid, the surgical and conservative treatment plan and measures are determined, in some cases also the indication, the type and extent of the operation and the indication for the required type of prosthesis or orthopedic device.

Post amputation residual limb conditions include:

– protracted granulating and non-healing wounds, trophic ulcers;
– eczema, allergic skin conditions;
– Soft tissue rollers, nematodes, trauma, abrasions.
Prosthetic practice shows that a significant number of patients have malformations and residual limb disease even at the stage of primary tibial and femoral prosthesis. This is due to the fact that patients often present for a primary prosthesis late after the amputation due to prolonged healing of the postoperative wound, the severity of the injury, coexisting pathologies, delays in establishing a disability group, creating an individual rehabilitation program or ignorance of prosthetic/orthopedic care and its procedures.

According to many orthopedic surgeons, 1.5 to 3 months after the amputation is the best time to refer a patient for initial prosthesis fitting. Prosthetics in later life is complicated by the formation of contractures, aggravation of coexisting pathologies, adynamia, loss of movement patterns and patients' often negative attitude to further prosthetics.
Soft tissue defects are very common (over 32 % of patients). Protracted, non-healing wounds result from temporary amputations due to marginal necrosis of the lobes, including those cut off due to vascular disease, frostbite, or abscesses in the surgical wound. They make a prosthetic fitting impossible and require intensive conservative and often surgical treatment.
Osteophytes (31 %) are among the most common post-amputation residual limb diseases in patients presented for primary prosthetics. Osteophytes most commonly occur on the shinbone stump. Painful neuromas also occur in a significant number of patients (15 %) shortly after amputation and before fitting a prosthesis. Phantom pain (more than 19 %) in the form of stabbing, pounding, squeezing and burning are very common. These also limit the use of the prosthesis. Other types of malformations and residual limb diseases are less common before primary prosthesis.
Movement therapy after amputation
Lack of exercise can lead to spasticity and contractures. The following exercises are indicated to prevent these consequences:
- In the starting supinated position, pull the limbs back and raise them as high as possible. Hold the body in this position for 5-10 seconds;
- When coming out of the supinated position, perform a similar exercise but raise your legs forward. Make sure the sound leg is not bent at the knee;
- In the starting position, lying on your side on the sound leg, raise the residual limb for 10 seconds.
Each exercise should be performed 5 or more times. Increase the load and time every day. Lying flat for up to 15 minutes and briefly moving the residual limb to the side is also helpful.
How to prevent the development of complications?
It is important to exercise daily because hypotrophy makes wearing a prosthesis and getting around difficult. A program of exercise favors the formation of the residual limb, helps eliminate tissue swelling and improve trophic function.
Treatment of a stump in the foot – is a demanding procedure that requires a lot of manipulation, skill, knowledge and time. Our medical staff is ready to help elderly people who have undergone surgery to settle in quickly and prevent the development of complications.
Over and beyond Pension for the elderly the following services:
- medical care;
- adequate nutrition;
- temporary or permanent residence;
- hygiene services;
- Free time activities;
- rehabilitation measures.
Experienced professionals can help you manage transitional difficulties in your life and improve your quality of life.
assessment of the stump
The residual limb is primarily considered from the point of view of its suitability for prosthetics, but the length and shape of the residual limb, the type and location of the scar, the condition of the skin and the range of motion of the overlying joints also play an important role.
Depending on the level of amputation, each large segment of the limb is conditionally divided into an upper, middle and lower third. In prosthetics, a distinction is made between short residual limbs (up to six centimeters) and long residual limbs after shortening the residual limb in the lower third or disarticulating the distal arm/foot segment. Stumps formed in the middle third of the amputated limb are considered optimal for prosthetics. In situations where the residual limb is too short or too long, custom prostheses should be used when options are limited.
It is known that after the amputation of a limb, the residual limb undergoes a natural process of restructuring and adaptation to the changed functional conditions. This is due to disruption of the integrity of the vascular and neural pathways affecting tissue trophicity, as well as the fact that some muscles lose their distal attachments and the medullary canal becomes exposed. Nerve regeneration often leads to the appearance of terminal neuromas.
Radiographs play a very important role in assessing residual limb condition. The radiographs are usually made in two perpendicular projections. In cases of doubt, the patient is referred for tomography and x-ray with so-called direct magnification. The muscular status of the residual limb is assessed by radiographic studies at rest and under tension and during prosthesis fitting with various functional loads, including standing and walking. If necessary, angio-, phlebo- or lymphography, ultrasound and radionuclide examinations are carried out, e.g. B. in residual limb edema.
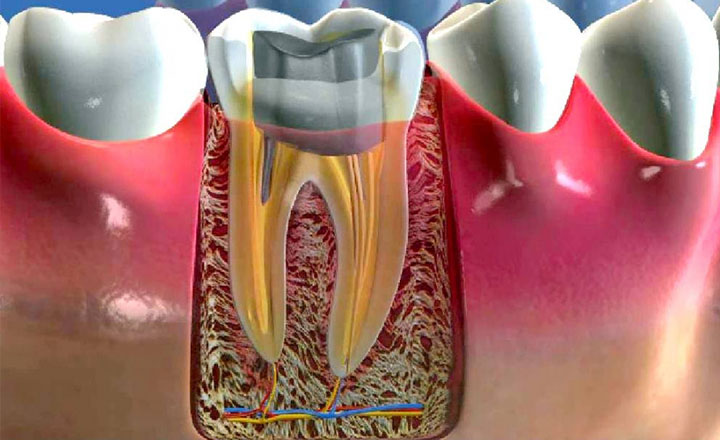
method of stump formation
Depending on the situation, different methods of stump formation are used:
- Core construction without a pin. This is possible if the tooth is not badly damaged and there is enough healthy tissue to securely support the crown.
- Core build-up with an inlay. The previously filled root canal is widened and a pin is inserted into the canal. The post is permanently cemented and serves to retain material and balance chewing forces.
- Insertion of a root canal post. This method is used when the patient's own tissue is sparse and building up a core with composite material is impractical.
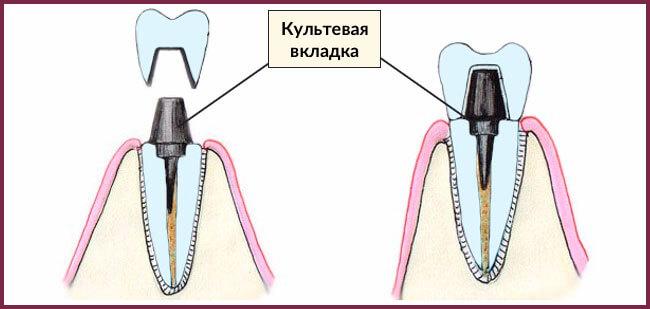
prosthetic care
When the inlay is complete, a crown can be placed on top. For anterior teeth and crowns made of ceramic or zirconium dioxide, the inlay should be light in color. Crowns made from these materials look as similar as possible to natural teeth. They also have the right level of translucency. Metal inlays shimmer through the ceramic. It is therefore important that the inlay meets the aesthetic requirements. Composite inlays fixed in the filter or intraoral zirconia inlays can be used.
When replacing chewing teeth, longevity is more important than aesthetics. Metal-fused porcelain is often used in this area, where the color of the stump is irrelevant and resilience is the most important thing. When the stump is complete, an impression of the jaw is taken to create a model. A crown is then made on the basis of this model.
In terms of reliability, a pin-shaped inlay is the preferred treatment option. Pin-shaped inlays are less secure and risk damaging the restoration.
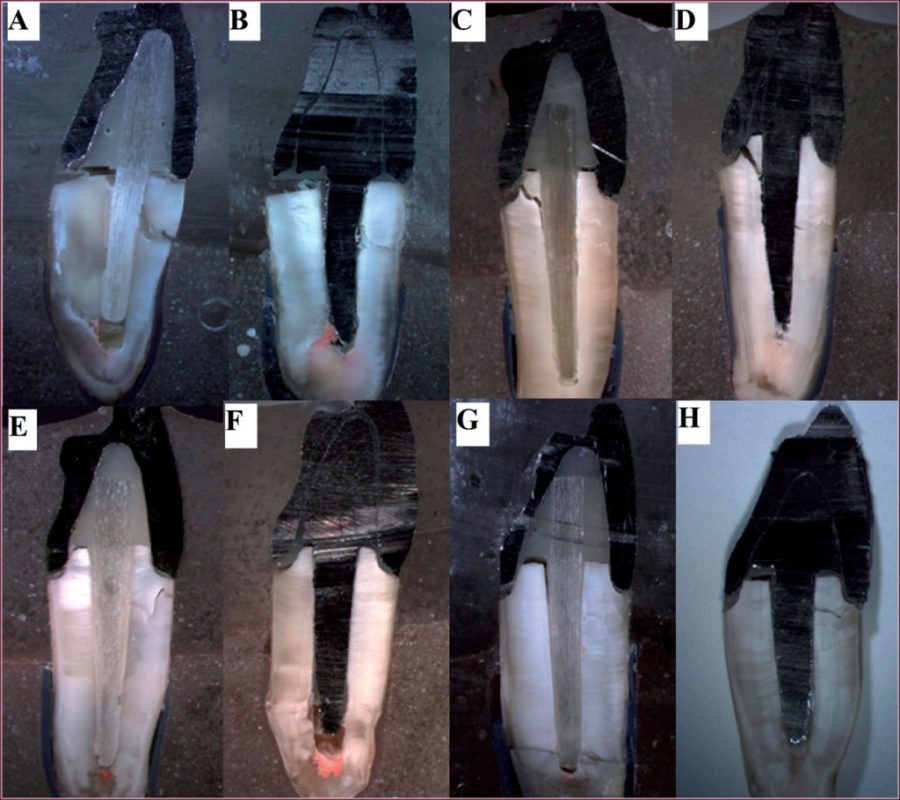
Use of cast inlays
This type of inlay is also known as a pen inlay. They are made under high pressure and high temperature. Structurally, the pin consists of a platform and retention pins. Cast core posts are suitable for the treatment of teeth with one or two roots; these pins are not used for multi-rooted teeth. In the latter case, foldable pins are used.
This type of inlay is used to restore badly damaged teeth. Therefore, high-strength materials are used for their manufacture: gold, cobalt and chromium alloys, as well as metal-ceramics. The advantage of cast inlays is that they do not require any special care, the usual oral care is sufficient.
In summary, the new dental techniques allow painless and safe restoration of teeth with crown inlays. With this procedure, even the most decayed tooth can be saved without resorting to complicated and costly implant techniques.
The future looks bright because the range of composite materials is constantly expanding and prosthesis technology is constantly being improved. The professionalism of dentists also increases with the mastery of new prosthetic and treatment techniques.
PREVENTION AND TREATMENT OF HIP CONTRACTURES
During a hip stump amputation, it is important that the stump be well retracted to allow for backward movement and dorsiflexion of the stump. If the musculature causes the residual limb to stand upright or 'look forward', the prosthesis will not be successful. (Fig. 1).
contraction – Inability to withdraw the stump normally. In the case of amputation defects at the level of the tibia, this means the inability to fully extend the knee joint. The shorter the residual limb in the thigh or shin, the faster the contracture will occur and the more difficult it is to reverse.
Prevention of contractures begins in the first few days after amputation.
To detect a contracture, flex the surviving residual limb (the other residual limb in the case of a double transfemoral amputation) and hold it against the abdomen. If the residual limb is pressed against the bed surface, there is no contracture. However, there is often an angle between the direction of the residual limb axis and the lying surface, which determines the degree of residual limb contracture. (Fig. 2).
The contracture of the residual limb should be worked on in the supine and supine position by stretching the tendons with weight and active stretching movements in the supine or standing position with crutches. In the supine position, the surviving stump (or the second stump) is secured to the torso with a wide, soft strap and a 5-8 kg sandbag is placed on the end of the stump (Fig. 3).
Remain in this position until the first signs of fatigue, numbness or goosebumps appear in the residual limb. After this time, remove the sandbag and perform general physical exercises – intense residual limb stretching movements – for 20 minutes. Then, lying prone, place a thick, soft pillow (rolled up several times from a blanket) under the end of the residual limb and the same sandbag on the buttocks of the amputated side. Stretch the flexor tendons again until the first signs of fatigue appear, then repeat the entire cycle if your general comfort allows. Remember that the success of training does not depend on the weight of the bag, but on the regularity and duration of training (Fig. 4).
PREVENTION AND DEVELOPMENT OF CONTRACTURES IN THE KNEE JOINT
When the knee joint is extended, the tibial axis is usually a continuation of the femoral axis.
The shorter the tibia stump, the faster the knee contracture will form and the harder it will be to get rid of.
Knee contractures should be prevented in the first few days after amputation. This is done by applying a band to the posterior surface of the shinbone stump and knee joint with a thigh grip. Holding the residual limb with the bandage during knee extension is a preventive measure against the formation of contractures in the knee joint.
The knee contracture should be worked on in the prone position with a roller placed under the knee and a weight placed on the stump to stretch the tendons of the knee joint. The weight is a sandbag (salt) weighing between 5 and 8 kg. (Fig.1)
A system with weights (dumbbells) can also be used to stretch the knee joint. Fig.2
In another position - sitting on a chair - the stump of the severed limb is placed on another chair on a sand roller, a weight of 5-8 kg is placed on the knee joint (Fig.3)
The contracture is worked on until the first signs of fatigue appear. Then the load is removed and general physical exercise - intensive upward movements of the residual limb in the knee joint - is carried out for 20 minutes.
With a slight contracture of the knee joint and in the presence of a tibial prosthesis, there are ways to eliminate the contracture. Fig. 4,5,6
Possible complications related to the manufacture of the inlay
After inserting the inlay, the dentist checks whether there are any possible complications:
- loosening of the inlay. This can happen due to lack of cement, drying out of the composite or failure to follow the instructions. The dentist reattachs the post to the cement; if there is severe loosening, a new restoration may be required.
- The root part is broken. See your dentist immediately, don't try to fix it yourself! The dentist will remove the broken piece and attach a new structure.
- Cracked or broken root. In this case, the tooth cannot be repaired and must be removed. Then a new treatment plan is created: a prosthetic bridge or an implant-supported prosthetic work.
questions and answers
A root canal post is a standard metal or fiberglass post that is bonded to the root canal. Several layers of composite material are applied around it. This method is obsolete as it is less reliable than an inlay and carries the risk of infection or loosening.
Comparison between a standard pin and a core builder inlay:
| Pen | inlay | |
|---|---|---|
| Preparation of the tissue | Gentler procedure. | Volumetric dissection, nerves in the pulp chamber are removed. |
| speed of treatment | Restoration of the tooth in 1 session. | Requires 2 visits (laboratory phase done). |
| reliability | The root and the outer part can separate. The root can break when inserting the post. | Unified system does not separate, fully adheres to the root (no splitting). |
| indications | With partial destruction of up to 50 % when the crown is not visible. Typically on a single root unit. | If the tooth is badly damaged, more than 60 %. A crown is always necessary. |
For the first 7-10 days, follow all the recommendations of the orthopedic dentist:
- Do not eat solid food, avoid hot and cold foods;
- Chew with the teeth on the opposite side of the jaw (if possible);
- Brush with a soft-bristled toothbrush to remove plaque, floss, and rinse after meals.
If the tooth is not badly damaged, the dentist can place a filling after the restoration. However, if the root of the tooth is uncertain, the dentist may recommend removing the tooth in order to place a bridge or crown on the implant.
Steps for placing crown inlays
The work begins with preparation: the dentist must identify all the patient's problems and remove all obstacles. Check that the roots are tight, that there is no inflammation, treat any periodontal problems, expose the subgingival part of the root, if necessary by coagulation or tissue cutting. An inlay differs from a core build-up in that it has a smaller contact area and is therefore more prone to movement.
When the client is confident they are ready for the next step, the excision of the diseased tissue begins. At the same time, the nerve is removed and the root canal is widened and then filled.
The next step is the modeling phase of the microprosthesis, for which two methods are used. The first uses a direct technique using wax, an ashless material. The prosthesis components are molded directly in the mouth and the blanks are passed to the technicians for further processing. The second method is the laboratory method, where the doctor takes an impression, which is then processed by a technician to create a template.
Once the template is ready and its geometry matches the anatomical shape, the fitting begins. The microprosthesis is only inserted when it fits perfectly and is cemented with or without correction.
Peculiarities of products from different raw materials
Considering the common modern solutions individually, each class of orthoses has a number of advantages.
First and foremost, ceramics offer an excellent appearance that matches the natural appearance of the restorative components in the mouth to almost 100 %. This option is important for metal-free crowns so that the darker substance of the tooth does not show through from the inside. The best results are achieved with ceramic restorations made of zirconium oxide, which has similar mechanical properties to titanium.
Metal constructions are best suited for posterior restorations. This material can withstand significant loads, does not deteriorate and maintains its integrity throughout the service life. In this class there is a demand for metal and metal-ceramic dentures and crowns.
Precious metal alloys are good because they have antibacterial properties and a high healing rate, so allergic reactions are practically impossible. In addition, they are resistant to degradation and structural changes when exposed to all factors and conditions of use.
As far as cutting techniques are concerned, castings are more commonly used as they are easier to manufacture. These are monolithic components whose platform replaces the tooth and whose pins are anchored in the roots. Detachable components sometimes have detachable attachments.
Read more:- cultural.
- The reamputation is.
- acetabulum.
- Colostomy - what is it?.
- prosthetic legs.
- Life after a leg amputation.
- Limb amputation.
- Indications for amputation.